OneClicks Overview
OneClicks are the equivalent of presets for different (supported) model types. All OneClicks generally operate the same way and produce similar results (as much as is possible considering the differences between model/character systems). The application of a OneClick on a supported model will configure:
- A SALSA module with visemes corresponding to our current recommendations.
- One EmoteR instance with SALSA-linked emphasis emotes.
- An Eyes module with head, eyes, and eyelids configurations.
Using a OneClick should be considered a starting point for setting up a character model. We have spent a lot of time testing different settings and configurations and have come up with a current setup that we believe creates a great look-and-feel. Please feel free to tweak and adjust any aspect that better suits your needs.
For a quick overview of how OneClicks are applied to character models, please see Part 4 (OneClicks), of our video tutorial series.
Available OneClick Options
OneClicks are only available for specific 3D character model systems as indicated below. However, nearly any model that uses blendshapes or bones (or both) for animation may be configured to work with SALSA LipSync Suite v2. You can also create your own custom OneClick to use your own custom settings or create a new custom OneClick supporting a completely different model or model system.
NOTE: Due to the complexity of the Autodesk and UMA OneClicks, they each have their own document page, linked below.
- DAZ 3D
- Reallusion CC3 & iClone
- ReadyPlayer.Me
- UMA DCS
- Mixamo Fuse
- Autodesk Character Generator (ACG)
- Creating a Custom OneClick
- Using the Create Custom OneClick Tool
OneClick Installation
- Make sure SALSA LipSync Suite is installed.
- If upgrading from previously-installed OneClicks prior to v2.1.0, first remove
the existing OneClick directory located
here:
Assets > Plugins > Crazy Minnow Studio > SALSA LipSync > Editor > OneClicks - Download and install the latest OneClick Base (REQUIRED for all OneClicks). Also ensure the appropriate version of the SALSA Suite is installed. Release notes for OneClickBase are located in the script itself.
- Download the appropriate model-specific OneClick unitypackage and install it. Release notes for all OneClicks are located in the OneClick Editor scripts.
NOTE: Installation of unitypackage files is quite simple. If you are new to the
process, please see this page.
Applying the OneClick
- Select the model's root in your scene.
- Apply the OneClick -- GameObject menu: Crazy Minnow Studio > SALSA LipSync > One-Clicks
- Hit 'Play'.
NOTE: If you installed the core examples, the included Promo-male audio clip will be assigned -- otherwise, add an AudioClip of your choice to the SALSA-linked AudioSource.
Currently Available OneClicks
Reallusion CC3 and iClone
Special instructions:
Reallusion is a very flexible system with varying ways to import and export
models. Generally speaking, if you are
specifically using iClone models, use the iClone OneClick. For most other
instances, use the CC3 OneClick. As new
updates or use-cases evolve, we will assess the situation and attempt to update
the OneClick to support models generated
from the system when we are made aware and when possible or warranted.
Current supported situations:
- Standard/Game iClone/CC3 exported models should work.
- DAZ models imported with 3DExchange system and leveraging the CC3 animation system should work with the CC3 OneClick.
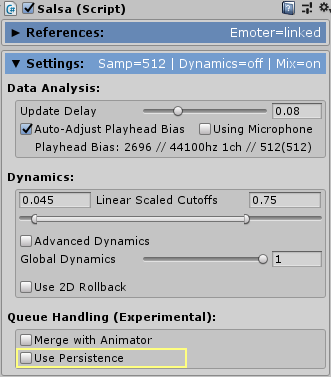
If you choose to create animations using blendshapes within the iClone/CC3 system, exported animations will interfere with SALSA, EmoteR, and Eyes. There are currently three options available to deal with this situation:
-
Do not export animations using blendshapes -- use the SALSA Suite to handle your character's facial animations.
-
Only use animations with blendshapes not being used by SALSA, EmoteR, or Eyes. This will require editing the animation and removing the conflicting blendshapes.
-
Try the experimental SALSA setting, enabling persistence mode. Also, Enable persistence on all conflicting emotes. Persistence does add overhead to the SALSA Suite; however, it may be negligible in most situations.
DAZ3D (for Genesis models)
Supported models: Genesis 1, 2, 3, 8, 8.1, 9
New as of v2.7.2:
- Genesis 9 models are now supported.
- Genesis 8.1 models have been re-worked and utilize far fewer blendshapes.
Special instructions:
- DAZ Studio morph export presets are available for Genesis 8, 8.1, and 9 models. This is a separate download in the downloads portal. These are csv files created within DAZ Studio. NOTE: If you load these presets, they will override any morph selections you have made -- so add them to your own presets, or create new presets including your personal selections if needed. If you need assistance with presets, please visit the DAZ website, they are best suited to provide help.
- Refactoring of class and file names for consistency and organization. Definitely remove old DAZ OneClick files prior to installing the new version.
For correct OneClick operation, it is necessary to export blendshapes from DAZ using the presets available on the downloads portal. This ensures the necessary blendshapes are available when the OneClick is applied. If you are using Genesis models prior to v8, you should still be able to use the "head" search pattern. We have some legacy information on DAZ exports available, but it is old and likely won't help much. If you want to check it out, please see our legacy DAZ article. If you need help exporting please visit the DAZ website, they are best suited to provide help.
(Mixamo) Fuse
Special instructions:
The official OneClick for Mixamo Fuse models applies to models created with the
Mixamo system prior to Adobe's purchase
and subsequent sunsetting of the product. Adobe-specific models do not work due
to inconsistent mesh/shape naming or (
more likely) no blendshapes at all. Models without blendshapes cannot be setup
to work with SALSA Suite. Models with
shapes (with inconsistent naming) can certainly be setup manually within the
SALSA Suite system; however, the available
OneClick would not completely configure a character. As mentioned, you can
manually setup a non-standard Fuse character
and create your own OneClick for
it (information on creating a custom OneClick solution).