QuickStart Guide
The following guide will walk through setting up the BoxHead character using a One-Click approach and a complete setup from scratch. BoxHead, and his one-click setup scripts, are included in the core asset and updates are made available in the Samples download pack available on this site. download examples pack here
Super Fast QuickStart Using One-Clicks (BoxHead)
QuickStart Guide to implementing Eyes on a very basic component. The following is designed to get the reader up-and-running as quickly as possible, without any explanation or theory. This guide will use the included Boxhead model for demonstration purposes.
- Add Boxhead to a blank scene. (These instructions assume a blank scene)
- Locate Boxhead in the Project window (Assets > Crazy Minnow Studio > Examples > 3D > boxHead.v2 > boxHead.v2.small
- Drag the Boxhead model (boxHead.v2.small) into the the Hierarchy window.
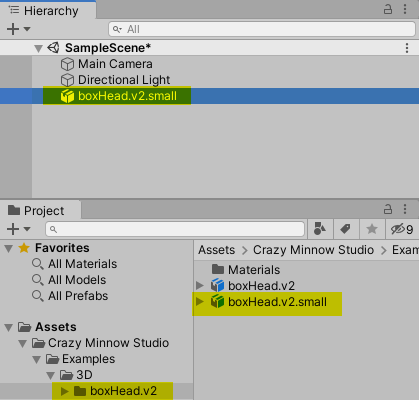
- Select the boxHead.v2_root object in the scene hierarchy.
- One-click setup Boxhead: (Designed for the v2.small version of the model)
- From the menu bar: GameObject > Crazy Minnow Studio > SALSA LipSync > One-Clicks > boxHead-demo
- Boxhead is now configured.
- Play the scene: The one-click auto-configures the SALSA, EmoteR, and Eyes components.
Normal QuickStart
QuickStart Guide to implementing Eyes on a very basic component. The following is designed to get the reader up-and-running as quickly as possible, with very little detailed explanation or theory; however, it does include the necessary steps for manual configuration. This guide will use the included Boxhead model for demonstration purposes.
- Add Boxhead to a blank scene. (These instructions assume a blank scene)
- Locate Boxhead in the Project window (Assets > Crazy Minnow Studio > Examples > 3D > boxHead.v2 > boxHead.v2.small
- Drag the Boxhead model (boxHead.v2.small) into the the Hierarchy window.
Eye inspector layout
Before adding the Eyes component, a little background about it's layout.
- The Eyes component has four sections:
- System Properties (global properties for the component)
- Head Configuration (template selection, properties, expressions, and components for heads)
- Eye Configuration (template selection, properties, expressions, and components for eyes)
- Eyelid Configuration (template selection, properties, expressions, and components for eyelid blinking and eyelid tracking)
- Components provide linkage to your characters animatable parts such as bones, blendshapes, sprites, etc.
- Expressions are like component containers. For example, if your character has two eyes with multiple directional blendshapes (up, right, down left) for each eye, then you might have two eye expressions with four directional components in each.
Add & setup Eyes
- Select the Boxhead object in the scene hierarchy.
- Add a Eyes component to the Boxhead object:
- From the menu bar: Component > Crazy Minnow Studio > SALSA LipSync > Eyes
- Using 'Add Component' button in Inspector window: click 'Add Component' > type 'eyes' in the search box > select the 'Eyes' script.
Configure System Properties
- Expand the section 'System Properties' (click anywhere on the header).
- Create and link a QueueProcessor by clicking the 'Add QueueProcessor' button.
- The header changed from gold to blue (indicating a successful configuration).
- Note that the Eyes component automatically linked 'boxHead.v2.small' as the 'Character Root'.
Head Configuration settings
- Expand the section 'Head Configuration' (click anywhere on the header).
- Select 'Bone_Rotation_XY' from the section 'Head Templates', and select 'YES' to overwrite the current head configuration.
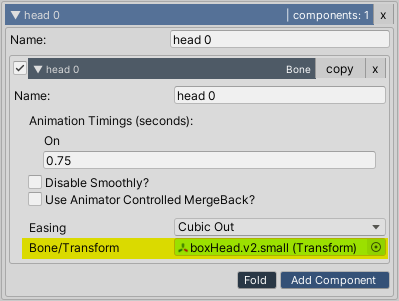
- Under the heading 'head 0 (config required)', drag the 'boxHead.v2.small' model from the hierarchy to the red highlighted field labeled 'Bone/Transform'.
- The 'Head Configuration' header changed from gold to blue (indicating a successful head configuration). However, the 'System Properties' header has changed again from blue back to gold (indicating a problem). This happened because the head cannot be the same Transform as the 'Character Root' field in 'System Properties').
- To address the issue above, click the 'Add Parent' button in the 'Character Root' section of 'System Properties'. Since the boxHead.v2.small model has no body, this empty parent acts as the body to allow head tracking.
- The 'System Properties' header changed from gold back to blue (indicating a successful configuration).
- Set the 'Target Offset' field in 'Properties' to X(0), Y(0.225), Z(0). This creates a vertical offset so the head looks slightly below the target while the eyes look directly at the target, keeping everything aligned in a natural looking way.
- The head configuration is complete, you can click the 'Head Configuration' header to collapse the section.
Eye Configuration settings
- Expand the section 'Eye Configuration' (click anywhere on the header).
- Select 'Blend Shapes' from the section 'Eye Templates', and select 'YES' to overwrite the current head configuration.
- The template defaults to two eye expressions (eye 0, and eye 1), since the 'boxHead.v2' model uses a single set of blendshapes to control both eyes, we can click the 'x' on the right side of the 'eye1 (config required)' header to delete the second eye expression.
- Drag 'boxHead.v2.small', which contains the SkinnedMeshRenderer and is now a child of 'boxHead.v2.small_root' in the hierarchy, to the 'SkinnedMesh' field of the Upper, Right, Lower, and Left component sections. Any time directional awareness is necessary, such as with directional blendshapes, the component Direction Type field is used to inform the system how to process. Select the 'Blendshape' name that corresponds to the Direction Type field name:
- Upper = lookUp
- Right = lookRight
- Lower = lookDown
- Left = lookLeft

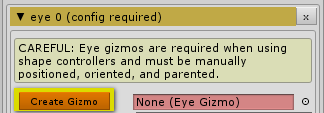
- Eye configurations that use the 'BlendShapes' template require a point of reference from which eye tracking calculations can be made.
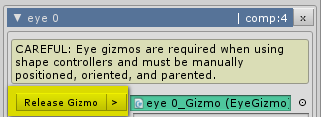
- Click the 'Create Gizmo' button to create this point of reference. An 'eye 0_Gizmo' was created and parented to the 'boxHead.v2.small' model.
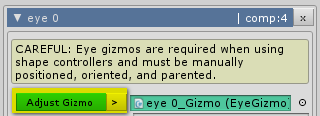
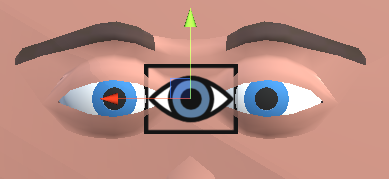
- Once the gizmo is created, the button is relabeled as 'Adjust Gizmo', clicking it will lock the inspector, and select the 'eye 0_Gizmo' in the hierarchy so that you can easily position it. For accurate individual eye tracking calculations, you would normally create one gizmo per eye expression and position each gizmo at the center of each eye. However, since the 'boxHead.v2.small' model uses a single set of blendshapes for both eyes, we only need one gizmo, and we'll position it between the eyes.
- The button is relabeled as 'Release Gizmo', clicking it will unlock the inspector and select the 'boxHead.v2.small' model in the hierarchy.
- Click the 'Create Gizmo' button to create this point of reference. An 'eye 0_Gizmo' was created and parented to the 'boxHead.v2.small' model.
- The eye configuration is complete, you can click the 'Eye Configuration' header to collapse the section.

Eyelid Configuration settings
- Expand the section 'Eyelid Configuration' (click anywhere on the header).
- Select 'Blend Shapes' from the section 'Eyelid Templates', and select 'YES' to overwrite the current head configuration.
- The template defaults to two eyelids (eyelid 0, and eyelid 1), since the 'boxHead.v2.small' model uses a single set of blendshapes to control both eyelids, we can click the 'x' on the right side of the 'eyelid1 (config required)' header to delete the second eyelid expression.

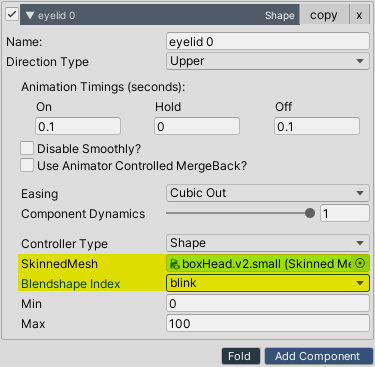
- The template defaults to use separate upper and lower eyelids, since the 'boxHead.v2.small' model uses a single blendshape to control the upper and lower lids, we'll use the eyelid 0 component with the Direction Type name Upper, and remove the eyelid 1 component with the Direction Type Lower by clicking the 'x' on the right side of the eyelid 1 component header.
- Drag the 'boxHead.v2.small' model from the hierarchy to the 'SkinnedMesh' field of the Direction Type Upper component section, and select the 'blink' blendshape.
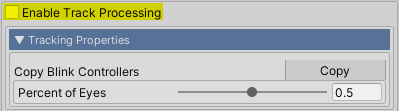
- Since the boxHead.v2.small model uses a single blendshape for Upper and Lower eyelids, we won't configure eyelid tracking.
- The eye configuration is complete, you can click the 'Eye Configuration' header to collapse the section.
Eyes is now configured for the included Boxhead model. Click play to try out the Eyes experience with random head and eye movement, and blinking.