ExpressionComponent (class)
Each main expression type (LipsyncExpression, EmoteExpression, EyeExpression, etc.) works hand-in-hand with a SALSA LipSync Suite component (SALSA, EmoteR, RandomEyes). Each is a collection of building-blocks called ExpressionComponents. While the expressions themselves have differing qualities and settings to support their particular type of expression, each ExpressionComponent is common across all expression types.
While some configuration details may be hidden in the components of each expression type, the underlying ExpressionComponent data structure is the same. For example, SALSA utilizes One-Way handlers to control its animations. One-Way handlers do not utilize the "Hold" animation timing, therefore, "Hold" is not displayed in the component settings.
In the inspector, an expression (Viseme, Emote, EyeMovement) requires at least one ExpressionComponent (component). Here is a component on a EmoteR emote (notice there is a "Hold" setting in the animation timings).
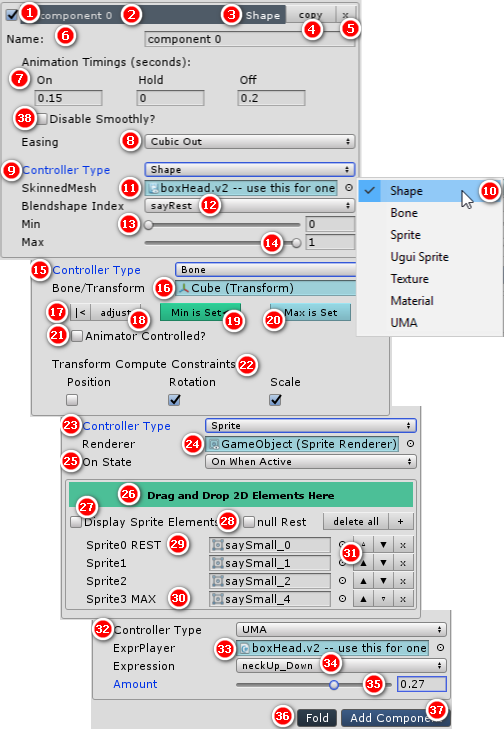
The base component elements are as follows:
-
Enable/disable a component. Disable a component by removing the tick in the checkbox on the left of the header. This will disable the component on all "activating" calls. Deactivating calls will still initiate a deactivation on the component. This is to ensure all components are able to turn off if they were on when the component is deactivated. When deactivated, a component's box color will turn a light red color and the title will indicated "(disabled)". Below are two components configured on an EmoteR emote, the first is disabled.
-
The Header Bar displays component information, the name and controller type for easy identification when collapsed. Name is simply for organization purposes, similar to the name field for the viseme itself. It is not used for any purpose by the SALSA engine. You may change the default name or leave it as-is.
-
Indicator for Controller type used for the component.
-
Copy/Paste action:
- Copy mode: select a component to copy.
- Paste mode: paste a previously copied component's values to another component. Or cancel the copy action on the copied component.
-
Delete this component.
-
Each component has a Name field that is strictly used for organizational purposes and is not used by any script component included within SALSA LipSync. Give it a friendly name for reference.
-
Set animation timings. All options may not be available in all modules based on applicability. i.e. SALSA does not offer a HOLD timing because it controls the visemes in a one-way manner. There are a couple of caveats to consider for these timings. Regardless of the starting position, a full round-trip animation, if unimpeded, will take the combined time of On/Hold/Off. For example, assume animation timings of 1.0/0.5/1.0: if an animation begins and it is already half-way to its On extent (it is overridding another animation), it will still take 1.0 seconds to complete the On-animation. It will then hold this position for 0.5 seconds and subsequently take 1.0 seconds to transition to Off (2.5 seconds).
-
Easing type for the animation - similar to web-based animation easings. Easing determines the attack/decay of the animation and there are several options available for use. These settings follow the same basic rules of the common web-based animation easing timings. For lip-synchronization, the more natural 'look' is a fast start, slow finish, an "out"-based easing. The recommended setting is cubicOut -- good fast to slow progress with a low calculation footprint.
-
Controller Type: Shape (blendshape)
-
Controller Type options
-
SkinnedMeshRenderer reference for shape controller type.
-
Blendshape selection
Over-driving Under-driving Blendshapes
-
Minimum shape value (animation OFF -- usually 0f).
NOTE: As of version 2.3.0, Shape component types now support over/under-driving the shape values. This is only supported in Unity version 2018.3+ and requires disabling the legacy blendshape clamping option in Project Settings > Player. To support this functionality, the Inspector has been switched to a float value (with no clamping limits). Additionally, the display value has been changed to represent the blendshape value desired rather than the underlying fractional value (i.e. 53.4 vs 0.534). Under the hood the value remains fractional for backwards compatibility with existing projects. Therefore, it is still required to use the fractional value when scripting against the API.
-
Maximum shape value at full (animation ON).
NOTE: As of version 2.3.0, Shape component types now support over/under-driving the shape values. This is only supported in Unity version 2018.3+ and requires disabling the legacy blendshape clamping option in Project Settings > Player. To support this functionality, the Inspector has been switched to a float value (with no clamping limits). Additionally, the display value has been changed to represent the blendshape value desired rather than the underlying fractional value (i.e. 53.4 vs 0.534). Under the hood the value remains fractional for backwards compatibility with existing projects. Therefore, it is still required to use the fractional value when scripting against the API.
-
Controller Type: Bone/Transform
-
Transform reference for bone controller type.
-
Return to initial stored transform settings. This value is saved immediately when the bone transform is linked to the reference slot (16).
-
Shortcut to adjust the transform for (Min) or (Max).
-
Minimum transform setting (animation OFF) -- usually the same as the initial transform settings (17).
-
Maximum transform setting (animation ON)
-
Select if externally controlled by another animator in the Update() loop (i.e. Mecanim). > NOTE: When selected, another option is available: Offset -- applies the configured animation as an offset to the externally controlled animation. Referential verses absolute.
-
Transform constraint settings. Enable to apply, disable to ignore.
-
Controller Type: Sprite (2D Switcher -- also applies to UGUI Sprite, Texture, Material)
-
Renderer reference for 2D Switcher controller type.
-
On State:
- On When Active: non-rest 2D elements are enabled during animation ON, once animation begins towards OFF the 'rest' element is immediately displayed. This option will work for lip-sync, but should not be used when multiple animation frames are used per viseme since the off animation will simply, immediately snap to the OFF (rest) position.
- On Active One: non-rest 2D element is enabled once animation ON has reached full normalized value (1.0f). OFF (rest) is then activated once the animation OFF has reached full normalized OFF value (0.0f). This option should not be used for lip-sync.
- On Until Off: non-rest 2D elements are animated the full cycle from OFF to ON to OFF. This is the appropriate option to choose for lip-sync where multiple 2D elements (frames) are configured per viseme.
-
Drag-n-drop area -- allows easy configuration of multi-frame animations.
-
Option to display larger views.
-
Null Rest is used to blank the 2D element while at rest. This is normally not used for lip-sync, but may be desired if an animation should only be present while it is being animated and then should disappear.
-
When 'null Rest' is not enabled, this position indicates the OFF (rest) 2D element. Similar to Min in a blendshape.
-
Indicates the full ON 2D element. Similar to Max in a blendshape.
-
2D element sort and delete options.
-
Controller Type: UMA DCS proxy
-
Reference link to the UmaUepProxy controller.
-
UMA ExpressionPlayer expression (similar to a blendshape selection).
-
Expression amount, similar to Max on a Shape controller. > NOTE: Most UMA expressions use a bidirectional amount setting. 0 > 1 indicates the primary name value and 0 > -1 indicates the secondary name value. For example: neckUp_Down; neckUp is the primary name value, therefore values [0 .. 1] will move the neck up. Values [-1 .. 0] will move the neck down.
-
Fold this Expression's components. Once 'folded', this option changes to 'Un-Fold', which does the opposite.
-
Add Component: add a new component to the current expression.
-
Disable Smoothly: controls the manner in which expression components are reset to their minimum setting when the module (SALSA/EmoteR) is disabled. Smoothly -- registers the components OFF using the same timings they would normally receive during an animation. Without enabling the smoothing option, the components are reset to minimum immediately.
Notes on Animation Timings
This section has been moved to its own page
Specialty Component Controllers
This section has been moved to its own page.
API Examples for ExpressionComponents
Overview
An ExpressionComponent has a somewhat complex data structure. All Expression types (i.e. LipsyncExpression, EmoteExpression, etc.) are composed of one or more ExpressionComponent(s). For the code samples below, consider the following hypothetical EmoteExpression, "smile".
For example, consider an emote called "smile". In some models, this emote may be made up of a single blendshape called 'smile', while in others, it may have two blendshapes ('smile_l' and 'smile_r'). Additionally, you may wish to add some additional expression in the eyes or eyebrows, such as 'eyes_wide' and 'brow_l_up' and 'brow_r_up'. So our hypothedical EmoteExpression called "smile" has multiple ExpressionComponent(s):
'smile_l' 'smile_r' 'eyes_wide'
'brow_l_up' * 'brow_r_up'
Editor Setting Manipulation
Emotes
To manipulate the settings of this EmoteExpression in the Editor configuration and the settings of the individual ExpressionComponents contained in the emote, we need to have reference to it/them. First, let's change some settings on the EmoteExpression itself, these settings will affect the entire emote. First grab a reference to the emote we are looking for. Refer to the EmoteR API for more information on the settings available.
NOTE: runtime manipulation of expressions is a bit more complex than Editor configuration changes since the normal controller configuration process must be called after the settings are changed. While manipulating Editor configurations (i.e. when creating your own custom OneClick configurations), it is not necessary to update the controller data since it will be accomplished at runtime Awake/Start.
Emoter emoter = gameObject.GetComponent<Emoter>; // need a ref to Emoter on this GObj

// find the emote to work on...'smile'
var myemote = emoter.FindEmote("smile"); // from the Emoter API

// manipulate the EmoteExpression settings...
myemote.isPersistent = true; // make this emote persistent in the QueueProcessor
myemote.isRandomEmote = true; // add this emote to the random pool
Now, let's update the components of this emote to use a different easing from the default type. We will change the easing to 'linear'. Continuing on from the above example, we will need to loop through each component in the EmoteExpression. The components are held in the Expression's expData.components, which is a List of type: ExpressionComponent.
foreach (var component in myemote.expData.components)
    component.easing = LerpEasings.EasingType.Linear;
Now, consider the desire to change the animation timing for the ON duration (for all configured emotes). In this example we need to loop through all emotes and then apply the change to each ExpressionComponent in each emote.
Emoter emoter = gameObject.GetComponent<Emoter>;
foreach (var emote in emoter.emotes) // emotes is the List of emotes.
    foreach (var component in emote.expData.components) // loop through each ExpressionComponent.
        component.durationOn = 0.11f; // change the duration ON animation timing.
Visemes
Visemes are slightly different to reference, there is currently no helper method for locating individual visemes because it is typically not something we need to do. But it is nearly as easy to implement. Let's find the viseme called "t" and change the component easing types to CircleIn and animation OFF timing to 0.06f. Salsa visemes are maintained in List<LipsyncExpression> visemes. We will use a lambda expression to find the viseme called "t".
NOTE: If the viseme "t" is not found, nothing will happen.
Salsa salsa = gameObject.GetComponent<Salsa>;
int idx = salsa.visemes.FindIndex(v => v.expData.name == "t"); // find valid viseme index...
if (idx > -1)
{
    var myviseme = salsa.visemes[idx]; // create reference to viseme.
    foreach (var component in myviseme.expData.components) // loop through components and change settings...
    {
        component.durationOff = 0.06f;
        component.easing = LerpEasings.EasingType.CircleIn;
    }
}