Eyes In-Depth
The Eyes module, included in the SALSA LipSync Suite, provides head, eye, and eyelid tracking, as well as blink control, for supported characters. It is template driven to simplify setup and can adapt to many different character configurations. This document will examine each section of the Eyes interface in detail to help you understand the various options that are available.
NOTE: Please read the section on interface discussion if you have not already done so. NOTE: See the API page for coding specific help.
SECTIONS
The Eyes component is divided into four sections; System Properties, Head Configuration, Eye Configuration, and Eyelid Configuration.
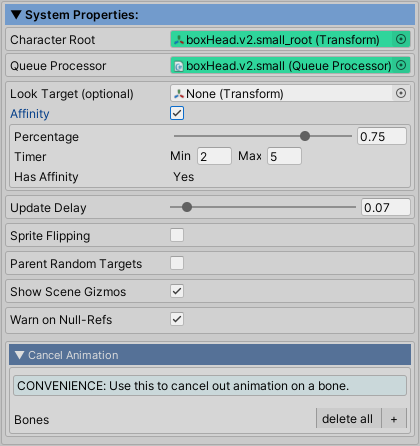
System Properties
This section is used to configure global properties that are used by multiple sections.
-
Character Root is the Transform component at the root of your characters hierarchy. It automatically links to the Transform where the Eyes component is added, but you can change it if your structure is different. Eyes uses this as a directional reference.
-
Queue Processor is required for operation. The queue is the brains behind handling animation calculations and conflicts. SALSA, EmoteR, and Eyes all use a QueueProcessor. A single QueueProcessor can be used for any number of SALSA, EmoteR, and/or Eyes instances. Or, you may also implement multiple queues if you like. We currently recommend one QueueProcessor per character model. This is the most performant configuration and there is no advantage to having a single processor for the entire scene.
NOTE: If Eyes does not detect a QueueProcessor in the scene, you may click the "Add QueueProcessor" button to create a GameObject with a QueueProcessor component. If Eyes detects a QueueProcessor in the scene, you may click the "Link Existing QueueProcessor" button to easily configure the link for Eyes.
-
Look Target is a link to any Transform you want to track with head, eyes, and/or eyelid movement. The Eyes system is always tracking a target, either one that is randomly generated, or the one linked to the Look Target field.
-
Affinity works like an attention span. When enabled, and tracking a Transform linked to the Look Target field, the character will stay focused on the target for the specified percentage of time. This percentage calculation occurs every min-max seconds. When affinity is lost, the character will adhere to any random settings that are enabled.
-
Update Delay is the delay (in seconds) between analysis updates. Longer: slower/smoother response. Shorter: faster/choppier response. The default is fine for most scenarios.
-
Sprite Flipping performs automatic left/right calculation flipping for 2D characters. Simply enable sprite flipping, select your flip type of either local scale flipping from 1 to -1 or SpriteRenderer axis flipping, and the tracking calculations will automatically flip when you flip your character.
Flip Type = Transform_X
- If using an 2D puppet rig, link the rig root to the Flip Reference and flip the character using root scale.X = 1 and -1. This will flip the tracking calculations automatically.
Flip Type = SpriteRenderer_X
- If using a sprite character, link the SpriteRenderer to the Flip Reference and flip the character using SpriteRenderer.Flip.X = true or false. This will flip the tracking calculations automatically.
-
Parent Random Targets - When enabled, the randomly generated tracking targets are parented to the character root. This is useful if your character is mobile and you want their random target to be moved along with them.
-
Show Scene Gizmos allows you to toggle on/off the scene gizmos that help with your initial configuration, but may be a distraction once configured. The gizmos include:
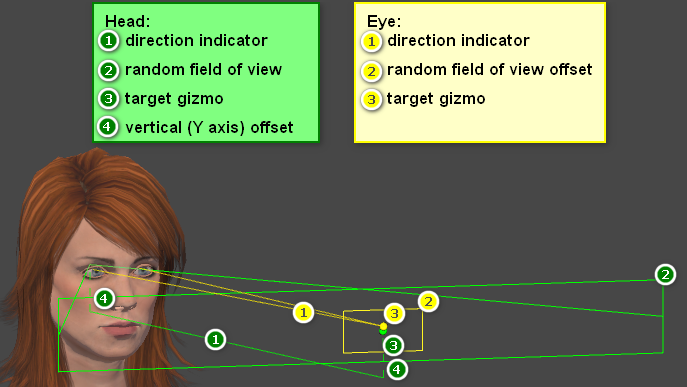
- Head (green):
- A line from the head bone indicating the gaze direction.
- A frustum indicating the field of view where random head directions can be created.
- A sphere indicating the current head target position.
- A dashed line indicating a vertical (Y axis) offset to align random head target generation with the eyes.
-
Eye (yellow):
- A line from the eyes indicating the gaze direction.
- A rectangle, centered on the current head target, indicating the field of view where random eye directions (saccades) can be created.
- A sphere indicating the current eye target position.
-
Warn on Null-Refs will emit console warnings if your component references are suddenly lost.
-
Cancel Animation allows you to link any bone where you want Mecanim animation to be canceled out. Linking a bone here will capture the start position and use it to overwrite all run-time animation influence on that bone. Click the [+] button to add, the [x] button to delete, or use the [delete all] button.
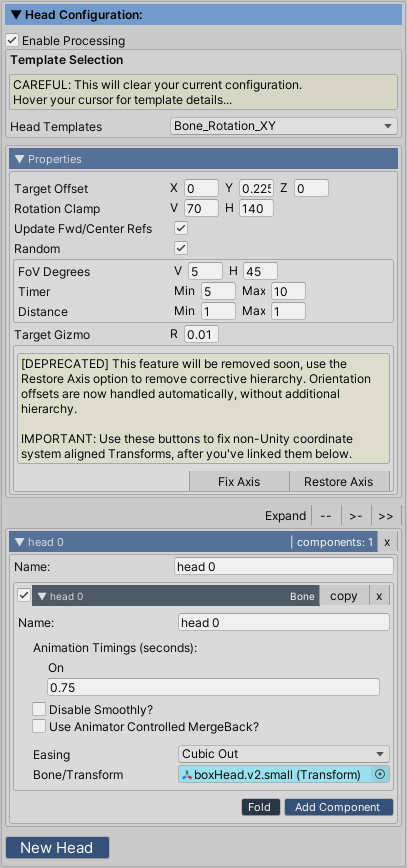
Head Configuration
In the head configuration section, you can link to one or more heads. This section requires you to begin by selecting a template, which will default the configuration options to match the selected template. Of course you can modify the settings after a template has been selected.
NOTE: Some properties are only visible when applicable.
Component processing
- Enable Processing (Head)
Template Selection
- Head Templates include the following options:
- None
No head configured
- Bone_Rotation_XY
Rotation on the X and Y axis. Typical of a 3D character. Defaults to one head expression with one Transform component.
- Bone_Rotation_Z
Rotation on the Z axis. Typical of a 2D character. Defaults to one head expression with one Transform component.
- None
Properties
NOTE: Some properties are only visible when applicable.
-
Random Target - Available at run-time, this allows you to generate a new random position in the inspector.
-
Target Offset - When head and eye configurations are active, the random eye gaze direction is based on an offset from the head gaze direction. This creates a natural looking relationship between the two. Since there is typically a vertical gap between a head bone and eye bones, you may want a vertical (Y axis) offset of the head target to ensure random position generation and tracking keep the head and eyes aligned in a natural way. Run the scene and align the green gizmo to project from the approximate vertical position of the eyes rather than from the head bone position, typically using a positive values on the Y offset.
-
Rotation Clamp clamps the head range of motion to the maximum degrees specified on the vertical, horizontal, or rotational axes.
-
Update Fwd/Center Refs - Enable this to continuously update the forward and center reference rotations to match the character root rotation.
-
Facing Camera - If your 2D character faces the camera, use this to flip the head tracking calculations automatically when a tracked target moves from left to right.
-
Random enables/disables random head movement
- FoV Degrees
Allows you to adjust the field of view in degree where random head positions can be generated. This is represented by the green frustum scene gizmo.
- Timer
A random value in seconds between the min and max values when new random positions are generated.
- Distance
The gap between the head bone and where random head positions are generated. You'll need to increase this value for very large characters so the generated targets are far enough away to allow a natural look. For 2D characters using the Bone_Rotation_Z template and facing the camera, setting a distance from -1 to 1 will create new head targets on either side of the character using the min or max distance extents, not a range between them. All other scenario generate a withing the range of min and max.
- FoV Degrees
-
Target Gizmo is the radius of the green sphere that represents the current head target location.
-
Fix Axis / Restore Axis - Unity uses a left handed coordinate system. If your characters head bone is not aligned to this system, you must use this option to automatically apply corrective hierarchy. To use, link your characters head bone(s), then click the Fix Axis button.
-
DEPRECATED - This feature was replaced with a rotation offset that is calculated automatically. The old method will remain in place for one update, giving you time to use the Restore Axis option to remove any corrective hierarchy.
-
Left Handed coordinate system:
- X positive (right)
- Y positive (up)
- Z positive (forward)
Expressions / Components
The SALSA LipSync Suite uses a unified inspector design across the entire suite for linking to various character components that can be animated, such as bones, blendshapes, sprites, materials, textures, UMA, etc. For the Eyes module, the type of components that can be animated depends on the section (Head, Eyes, or Eyelids), and the template selected. However, there is always a common underlying structure: Expression containers, with component children inside each expression container. For the Head Configuration section, only bone/Transform components are available, and this allows support for 3D character rig hierarchies as well as 2D character sprite hierarchies.
-
Expression
- Name
Expression names are for your convenience only, they are not used in processing.
- Name
-
Component:
-
Name
Component names are for your convenience only, they are not used in processing.
-
Animation Timings (seconds)
On - How long it takes to animate to an on position, rotation, or scale.
-
Disable Smoothly
When an expression component is disabled, should the animation be reset smoothly or instantly.
-
Use Animator Controlled MergeBack
Though it is recommended to use the global option (Merge with influencer) available on the QueueProcessor component, this option provides the same capability at the component level.
-
Easing
Controls the animation easing or interpolation type.
-
Bone/Transform
Link to your character bone or Sprite transform.
-
-
Add Component
Add an additional component to this expression.
-
New Head
Add an additional expression.
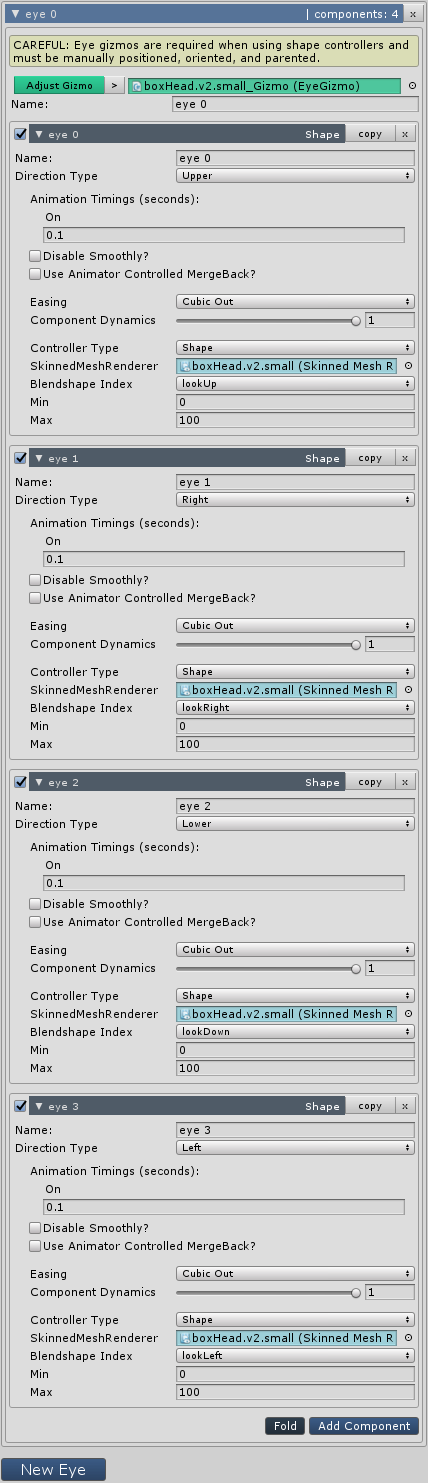
Eye Configuration
In the eye configuration section, you can link to one or more eyes. This section requires you to begin by selecting a template, which will default the configuration options to match the selected template. Of course you can modify the settings after a template has been selected.
NOTE: Some properties are only visible when applicable.
Component processing
- Enable Processing (Eye)
Template Selection
-
Eye Templates include the following options:
-
None:
No eye configured
-
Bone_Rotation
Rotational tracking. Typical of a 3D character. Defaults to two eye expressions with one Transform component each.
-
Bone_Position
Positional tracking. Typical of a 2D character. Defaults to two eye expressions with two Transform components each. One component uses the Direction Type Upper, and the other component uses the Direction Type Right, each should be linked to the same eye. When setting up a Bone_Position template you must capture the maximum upper and maximum right positions, the system will use these to calculate the maximum lower and maximum left extents for your total eye range of motion.
-
BlendShapes
Blendshape tracking. Typical of a 3D character. Defaults to two eye expressions with four Shape components each (Upper, Right, Lower, Left).
-
Sprite_Sectors: Swaps directional sprites. Options include the following:
- Two (right, left): Set Right component MAX to right Sprite. Set REST to left Sprite.
- Three (right, left, center): Set Right component MAX to right Sprite, and Left component MAX to left Sprite. Set all component REST fields to center Sprite.
- Five (upper, right, lower, left, center): Set Up component MAX to up Sprite, Right component MAX to right Sprite, Down component MAX to down Sprite, and Left component MAX to left Sprite. Set all component REST fields to center Sprite.
- Nine (upper, upper right, right, lower right, lower, lower left, left, upper left, center): Set Up component MAX to up Sprite, UpperRight component MAX to upper right Sprite, Right component MAX to right Sprite, LowerRight component MAX to lower right Sprite, Down component MAX to down Sprite, LowerLeft component MAX to lower left Sprite, Left component MAX to left Sprite, and UpperLeft component MAX to upper left Sprite. Set all component REST fields to center Sprite.
-
Material_Sectors
- Two (right, left): Set Right component MAX to right Material. Set REST to left Material.
- Three (right, left, center): Set Right component MAX to right Material, and Left component MAX to left Material. Set all component REST fields to center Material.
- Five (upper, right, lower, left, center): Set Up component MAX to up Material, Right component MAX to right Material, Down component MAX to down Material, and Left component MAX to left Material. Set all component REST fields to center Material.
- Nine (upper, upper right, right, lower right, lower, lower left, left, upper left, center): Set Up component MAX to up Material, UpperRight component MAX to upper right Material, Right component MAX to right Material, LowerRight component MAX to lower right Material, Down component MAX to down Material, LowerLeft component MAX to lower left Material, Left component MAX to left Material, and UpperLeft component MAX to upper left Material. Set all component REST fields to center Material.
-
Texture_Sectors
- Two (right, left): Set Right component MAX to right Texture. Set REST to left Texture.
- Three (right, left, center): Set Right component MAX to right Texture, and Left component MAX to left Texture. Set all component REST fields to center Texture.
- Five (upper, right, lower, left, center): Set Up component MAX to up Texture, Right component MAX to right Texture, Down component MAX to down Texture, and Left component MAX to left Texture. Set all component REST fields to center Texture.
- Nine (upper, upper right, right, lower right, lower, lower left, left, upper left, center): Set Up component MAX to up Texture, UpperRight component MAX to upper right Texture, Right component MAX to right Texture, LowerRight component MAX to lower right Texture, Down component MAX to down Texture, LowerLeft component MAX to lower left Texture, Left component MAX to left Texture, and UpperLeft component MAX to upper left Texture. Set all component REST fields to center Texture.
-
-
Sector Count
When using sectors, this allows you to specify the sector count. See the template section above for the sector options available.
-
Forward Sector Radius
Use to specify a circular region around the eyes and perpendicular to the characters forward direction. When a tracked target enters this circular region, the center sector is triggered.
Properties
NOTE: Some properties are only visible when applicable.
-
Random Target - Available at run-time, this allows you to generate a new random position in the inspector.
-
Clamp Degrees clamps the head range of motion to the maximum degrees specified on the vertical, and horizontal axes.
-
Random - Enable/disable random eye position generation.
- FoV Degrees
Eye random movement field of view in degrees. Used when there is no look target or randomly generated head target.
- FoV Offset
Eye random movement maximum horizontal and vertical offset from a target. This could be the look target in System Properties or a random generated head target position.
- FoV Offset Affinity
Eye random movement maximum horizontal and vertical offset from a target when using Affinity, hasAffinity equals false, and no head is configured.
- Timer
A random value in seconds between the min and max values when new random positions are generated.
- Distance
The gap between the eye bone and where random eye positions are generated. You'll need to increase this value for very large characters so the generated targets are far enough away to allow a natural look. For a 2D character facing the camera and using the Bone_Position template, the min and max can be something like -1 and 1, and the extents will be used to generate random look targets on either side of the character. In all other scenarios, the min and max will generate a number between these values.
- FoV Degrees
-
Target Gizmo is the radius of the yellow sphere that represents the current eye target location.
-
Renderer setter is a convenience tool that allows you to apply a Renderer to multiple components at once.
-
Fix Axis / Restore Axis - Unity uses a left handed coordinate system. If your characters eye bones are not aligned to this system, you must use this option to automatically apply corrective hierarchy. To use, link your characters eye bones, then click the Fix Axis button.
-
DEPRECATED - This feature was replaced with a rotation offset that is calculated automatically. The old method will remain in place for one update, giving you time to use the Restore Axis option to remove any corrective hierarchy.
-
- Left handed coordinate system
- X positive (Right)
- Y positive (up)
- Z positive (forward)
Expressions / Components
The SALSA LipSync Suite uses a unified inspector design across the entire suite for linking to various character components that can be animated, such as bones, blendshapes, sprites, materials, textures, UMA, etc. For the Eyes module, the type of components that can be animated depends on the section (Head, Eyes, or Eyelids), and the template selected. However, there is always a common underlying structure: Expression containers, with component children inside each expression container. For the Eye Configuration section, the following component types are available: bone/transforms, blendshapes, sprites, materials, and textures.
-
Expression
- Name
Expression names are for your convenience only, they are not used in processing.
- Name
-
Component
-
Eye Gizmo
Manual eye gizmos must be created, positioned at the eye locations, and parented to the eye parent (usually the head) when using blendshapes. This tells the Eyes system where your characters eyes are and how they are oriented for tracking calculations.
-
Name
Component names are for your convenience only, they are not used in processing.
-
Direction Type
Used whenever direction awareness is necessary. Options include: None, Upper Left, Upper, Upper Right, Left, Center, Right, Lower Left, Lower, Lower Right.
-
Animation Timings (seconds)
- On - How long it takes to animate to an on position, rotation, or scale.
-
Disable Smoothly
When an expression component is disabled, should the animation be reset smoothly or instantly.
-
Easing
Controls the animation easing or interpolation type.
-
Dynamics
Animates the component by a percentage of it's full potential. 0 = no movement, 1 = full movement.
-
Controller Type - Set by the template and shouldn't need to be changed. Instead use a different template if you want to change your configuration.
-
Shape - Blendshape
SkinnedMesh - SkinnedMeshRenderer component that contains blendshapes.
Min - Off value for the expression component.
Max - On value for the expression component.
Bone/Transform
- Transform - Bone or sprite transform component.
Sprite
Renderer - SpriteRenderer
On State:
- On When Active
- On Active One
- On Until Off
2D Elements - You can have as many frames as you want. Fewer for abrupt transitions, or more for smoother transitions. Sequence elements from REST to MAX.
Material
Renderer
On State:
- On When Active
- On Active One
- On Until Off
2D Elements - You can have as many frames as you want. Fewer for abrupt transitions, or more for smoother transitions. Sequence elements from REST to MAX.
Texture
Renderer - Renderer
On State:
- On When Active
- On Active One
- On Until Off
2D Elements - You can have as many frames as you want. Fewer for abrupt transitions, or more for smoother transitions. Sequence elements from REST to MAX.
UMA
ExpPlayer - Link to an UmaUepDriver.
Amount - Value for the expression component.
-
Add Component
Add an additional component to this expression.
-
New Eye
Add an additional expression.
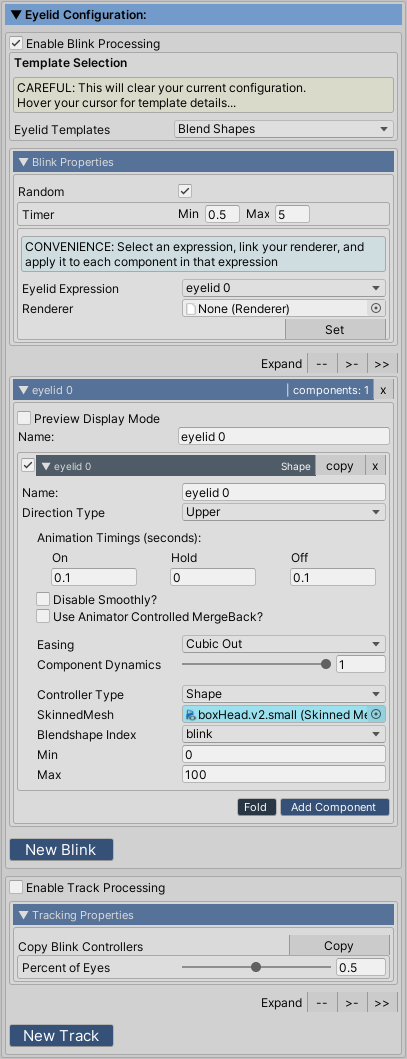
Eyelid Configuration
In the eyelid configuration section, you can link to one or more eyelids for blink control and eyelid tracking. This section requires you to begin by selecting a template, which will default the configuration options to match the selected template. Of course you can modify the settings after a template has been selected.
NOTE: Some properties are only visible when applicable.
Component processing
- Enable Processing (Eyelid blinking)
Template Selection
-
Eye Templates include the following options:
-
None
No eyelid configured
-
Bone_Rotation
Rotational tracking. Defaults to two eyelid expressions with two Transform components each (Upper and Lower, if you don't have independant eyelids, use Upper).
-
Bone_Position
Positional tracking. Defaults to two eyelid expressions with two Transform components each (Upper and Lower, if you don't have independant eyelids, use Upper).
-
BlendShapes
Blendshape tracking. Typical of a 3D character. Defaults to two eyelid expressions with two Shape components each (Upper and Lower, if you don't have independant eyelids, use Upper).
-
Sprite_Swap: Swap sprite frames. Defaults to two eyelid expressions with two Sprite components each (Upper and Lower, if you don't have independant eyelids, use Upper). Options include the following:
- Single sprite (closed eyelid) with null Rest enabled.
- Multiple sprite frames animating from the REST (eyelid open) sprite to the MAX (eyelid closed) sprite, with as many frames as you want in between.
-
Material_Swap: Swap Material frames. Defaults to two eyelid expressions with two Sprite components each (Upper and Lower, if you don't have independant eyelids, use Upper). Options include the following:
- Single material (closed eyelid) with null Rest enabled.
- Multiple material frames animating from the REST (eyelid open) material to the MAX (eyelid closed) material, with as many frames as you want in between.
-
Texture_Swap: Swap Texture frames. Defaults to two eyelid expressions with two Sprite components each (Upper and Lower, if you don't have independant eyelids, use Upper). Options include the following:
- Single texture (closed eyelid) with null Rest enabled.
- Multiple texture frames animating from the REST (eyelid open) texture to the MAX (eyelid closed) texture, with as many frames as you want in between.
-
UMA
- UmaUepProxy - Defaults to two eyelid expressions with two Sprite components each (Upper and Lower, if you don't have independant eyelids, use Upper).
- Expression - Select an expression from those built into the UMAExpressionPlayer.
- Amount - Similar to a blendshape but ranges from -1 to 1.
-
Blink Properties
NOTE: Some properties are only visible when applicable.
-
Blink - Available at run-time, this allows you to generate a new blink in the inspector.
-
Random enables/disables random blinking
- Timer
A random value in seconds between the min and max values when new blinks are generated.
- Timer
-
Renderer setter is a convenience tool that allows you to apply a Renderer to multiple components at once.
-
Return Min / Capture Max - A convenience tool that allows you to capture max bone/transform changes on multiple components at once, and return bone/transforms back to their min (start) value on multiple components at once.
-
Fix Axis / Restore Axis - Unity uses a left handed coordinate system. If your characters eyelid bones are not aligned to this system, you must use this option to automatically apply corrective hierarchy. To use, link your characters eyelid bones, then click the Fix Axis button.
-
DEPRECATED - This feature was replaced with a rotation offset that is calculated automatically. The old method will remain in place for one update, giving you time to use the Restore Axis option to remove any corrective hierarchy.
-
- Left handed coordinate system
- X positive (Right)
- Y positive (up)
- Z positive (forward)
Blink Expressions / Components
The SALSA LipSync Suite uses a unified inspector design across the entire suite for linking to various character components that can be animated, such as bones, blendshapes, sprites, materials, textures, etc. For the Eyes module, the type of components that can be animated depends on the section (Head, Eyes, or Eyelids), and the template selected. However, there is always a common underlying structure: Expression containers, with component children inside each expression container. For the Blink Configuration section, the following component types are available: bone/transforms, blendshapes, sprites, materials, and textures.
-
Expression
- Name
Expression names are for your convenience only, they are not used in processing.
- Name
-
Component
-
Name
Component names are for your convenience only, they are not used in processing.
-
Direction Type
Used whenever direction awareness is necessary. Options include: None, Upper Left, Upper, Upper Right, Left, Center, Right, Lower Left, Lower, Lower Right.
-
Animation Timings (seconds)
- On - How long it takes to animate to an on position, rotation, or scale.
- Hold - How long to hold a position, rotation, or scale.
- Off - How long it takes to animate to an off position, rotation, or scale.
-
Disable Smoothly
When an expression component is disabled, should the animation be reset smoothly or instantly.
-
Use Animator Controlled MergeBack
Enable if an external process is also controlling this transform (i.e. Mecanim), enable this option to smoothly return to external control.
-
Easing
Controls the animation easing or interpolation type.
-
Dynamics
Animates the component by a percentage of it's full potential. 0 = no movement, 1 = full movement. This can be calculated automatically when using different sized 2D eyes to allow for proportional movement. See the section in Eye Configuration Properties for more details.
-
Controller Type - Set by the template and shouldn't need to be changed. Instead use a different template if you want to change your configuration.
-
Shape - Blendshape
SkinnedMesh - SkinnedMeshRenderer component that contains blendshapes.
Min: Minimum blendshape value
Max: Maximum blendshape value
Bone/Transform
- Transform - Bone or sprite transform component.
Sprite
Renderer - SpriteRenderer
On State:
- On When Active
- On Active One
- On Until Off
2D Elements - You can have as many frames as you want. Fewer for abrupt transitions, or more for smoother transitions. Sequence elements from REST to MAX.
Texture: Renderer
- On State - Select the appropriate processing mechanism to control the on/off state of the element.
- On When Active
- On Active One
- On Until Off
- 2D Elements - You can have as many frames as you want. Fewer for abrupt transitions, or more for smoother transitions. Sequence elements from REST to MAX.
Material: Renderer
- On State - Select the appropriate processing mechanism to control the on/off state of the element.
- On When Active
- On Active One
- On Until Off
- 2D Elements - You can have as many frames as you want. Fewer for abrupt transitions, or more for smoother transitions. Sequence elements from REST to MAX.
UMA: UmaUepProxy
- Expression - Select an expression from those built into the UMAExpressionPlayer.
- Amount - Similar to a blendshape but ranges from -1 to 1.
-
Add Component
Add an additional component to this expression.
-
New Blink
Add an additional eyelid blink expression.
Component processing
- Enable Processing (Eyelid tracking)
Track Properties
-
Copy Blink Controllers - Configure your blink controllers first, then copy the settings to the tracking controllers. Remember to specify the eye to track.
-
Percent of Eyes - Eyelids will move a percentage of the eye movement.
Track Expressions / Components
The SALSA LipSync Suite uses a unified inspector design across the entire suite for linking to various character components that can be animated, such as bones, blendshapes, sprites, materials, textures, etc. For the Eyes module, the type of components that can be animated depends on the section (Head, Eyes, or Eyelids), and the template selected. However, there is always a common underlying structure: Expression containers, with component children inside each expression container. For the Track Configuration section, the following component types are available: bone/transforms and blendshapes.
-
Expression
-
Name
Expression names are for your convenience only, they are not used in processing. (example name: head).
-
Track Eye
When eyelid eye tracking is enabled, use this to select a reference eye.
-
-
Component
-
Name
Component names are for your convenience only, they are not used in processing.
-
Direction Type
Used whenever direction awareness is necessary. Options include: None, Upper Left, Upper, Upper Right, Left, Center, Right, Lower Left, Lower, Lower Right.
-
Animation Timings (seconds) > On - How long it takes to animate to an on position, rotation, or scale. > Hold - How long to hold a position, rotation, or scale. >* Off - How long it takes to animate to an off position, rotation, or scale.
-
Disable Smoothly - When an expression component is disabled, should the animation be reset smoothly or instantly.
-
Use Animator Controlled MergeBack - Enable if an external process is also controlling this transform (i.e. Mecanim), enable this option to smoothly return to external control.
-
Easing - Controls the animation easing or interpolation type.
-
Dynamics - Animates the component by a percentage of it's full potential. 0 = no movement, 1 = full movement. This can be calculated automatically when using different sized 2D eyes to allow for proportional movement. See the section in Eye Configuration Properties for more details.
-
Controller Type is set by the template and shouldn't need to be changed. Instead use a different template if you want to change your configuration.
-
Shape - Blendshape
SkinnedMesh - SkinnedMeshRenderer component that contains blendshapes.
Min: Minimum blendshape value
Max: Maximum blendshape value
Bone/Transform
- Transform - Bone or sprite transform component.
Sprite
Renderer - SpriteRenderer
On State:
- On When Active
- On Active One
- On Until Off
2D Elements - You can have as many frames as you want. Fewer for abrupt transitions, or more for smoother transitions. Sequence elements from REST to MAX.
Texture
On State:
- On When Active
- On Active One
- On Until Off
2D Elements - You can have as many frames as you want. Fewer for abrupt transitions, or more for smoother transitions. Sequence elements from REST to MAX.
Material
On State:
- On When Active
- On Active One
- On Until Off
2D Elements - You can have as many frames as you want. Fewer for abrupt transitions, or more for smoother transitions. Sequence elements from REST to MAX.
UMA
ExpPlayer - Link to an UmaUepDriver.
Amount - Similar to a blendshape but ranges from -1 to 1.
-
Add Component
Add an additional component to this expression.
-
New Track
Add an additional eyelid tracking expression.