SALSA In-Depth
Watch our video tutorial series for SALSA LipSync Suite v2.
SALSA LipSync 2.0 uses real-time audio analysis to produce compelling lip-synchronization using an approximation technique. SALSA is not a phoneme mapping solution and it should not be expected to produce 100% accurate lip-synchronization. Instead, the superior gains in workflow and ease-of-use balance out the system and create extremely good results with low-impact effort.
NOTE: Please read the section on interface discussion if you have not already done so.
SALSA 2 brings several new technologies together to vastly improve the results provided in previous versions of the product. Much of SALSA's power can be leveraged without writing any code. This, of course, depends on the requirements and situation where SALSA is being used. For more advanced requirements, please visit the API documentation. For best-practices use and an in-depth understanding of how SALSA works, read on.
The SALSA component is divided into three sections; Processing, Settings, and Configuration.
References Section
This section is used to configure the required and optional external reference links SALSA uses for operation.
-
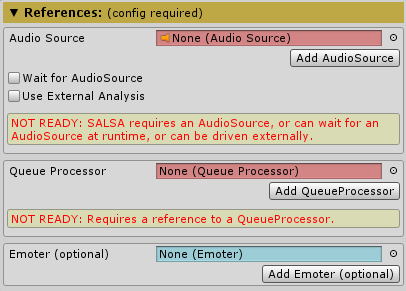
An AudioSource is necessary for SALSA to analyze the audio input. The reference slot is red when a valid configuration is not detected. A lack of proper configuration also sets the section header (Processing Links) to an gold color with a "config required" note and a warning box indicating the problem (as seen in the image above). There are several options available, making the assignment of an AudioSource as easy as possible.
-
Click the [Add AudioSource] button if you wish to easily add and link an AudioSource to the local GameObject.
-
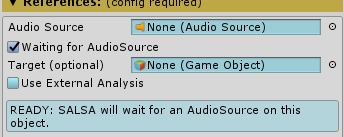
If an AudioSource is not available at design time, select the Wait for AudioSource option and SALSA will wait for the AudioSource to appear on its GameObject. If the AudioSource will be available (at runtime) on a different object, you can link that GameObject to the Target slot.
-
If SALSA's analysis computations should be driven from an external source (such as SalsaTextSync), enable the Use External Analysis option. You should only use this option if you are familiar with add-ons that require it or are creating your own solution for driving SALSA's animations. Enabling this option and not providing analysis data to SALSA will result in absolutely nothing happening.
NOTE: This option is only available when an AudioSource is not linked with SALSA. Our focus is on getting Inspector settings out of the way when not in use or not needed. The majority of users will simply be linking SALSA to an AudioSource and have no interest in driving analysis externally. Linking an AudioSource indicates that is the desired operation.
-
A QueueProcessor is also required for SALSA operation. The queue is the brains behind handling animation calculations and conflicts. SALSA, EmoteR, and Eyes all use a QueueProcessor to at least some extent. A single QueueProcessor can be used for any number of SALSA, EmoteR, and/or Eyes instances. Or, you may also implement multiple queues if you like. There are no settings necessary for queue operation. Simply link a QueueProcessor to SALSA and configuration for the queue is complete.
NOTE: If SALSA does not detect a QueueProcessor in the scene, you may click the "Add QueueProcessor" button to create a GameObject with a QueueProcessor component. If SALSA detects a QueueProcessor in the scene, you may click the "Link Existing QueueProcessor" button to easily configure the link for SALSA.
-
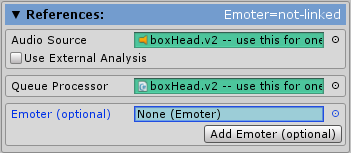
Once an AudioSource is linked (or waiting) and a QueueProcessor is linked, SALSA's processing link requirements are complete and the section turns from gold to blue. The header will then indicate whether or not you have an Emoter linked since it is an optional component.
-
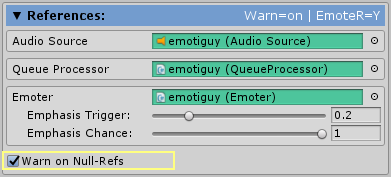
Since an Emoter link is optional, its reference link slot is blue, indicating a valid configuration. Linking an Emoter component to SALSA provides extra benefits, allowing SALSA to send configurable emote triggers to EmoteR. EmoteR settings are not visible if an EmoteR is not linked. If an EmoteR is linked, the slot will turn green and the Emphasis Trigger setting will be visible. This slider represents a [0..1] normalized scale of audio analysis (0 indicating full silence, 1 indicating maximum audio amplitude). Read more about the emphasis link between SALSA and EmoteR.

-
Once the processing links are minimally configured, the header bar will turn blue. This section can be collapsed if desired by clicking the header bar.
Controller Null References
As of version 2.5.0+, SALSA will confirm a component controller is valid prior to attempting registration with the QueueProcessor. A proper configuration at design-time will always result in proper controller configuration. However, if a component is properly configured at design-time and the controller object is subsequently disabled/deleted at runtime, the reference is now null. Likewise, if a component is improperly configured or initialized at run-time (see Runtime Configuration), the controller may have a bad (null) reference. SALSA will issue warnings to the console when such configurations are detected. If this bad configuration is expected/desired these warnings may be suppressed by disabling the "Warn on Null-Refs" option.
Configuration Preview
SALSA v2.5.2+ introduces an Editor-based configuration preview which demonstrates the current configuration (including audio) without the need to enter play mode.
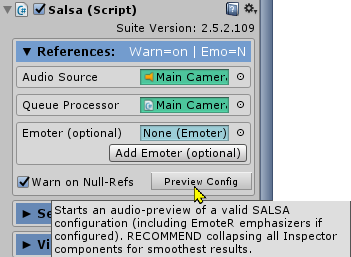
Requirements to preview the configuration are: Linked AudioSource with Clip, Linked QueueProcessor, and at least one configured viseme. The tool-tip will display remaining requirements if all requirements have not been met.
NOTE: Due to the heavy resource usage of the Editor and Inspector, preview playback performance will vary from machine to machine. It is highly recommended to collapse all Inspector components prior to starting preview. This has been satisfactorily tested on a very minimal Mac mini from 2012 with an i5 (3210m) processor and Unity 2018.4. Alternatively, it works fantastically on a powerful, modern machine.
Settings Section
The settings section currently does not have any configuration requirements outside of the defaults and therefore does not exhibit the gold, config-required display. It is divided into two sections (Data Analysis and Dynamics).
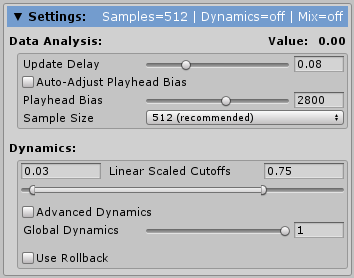
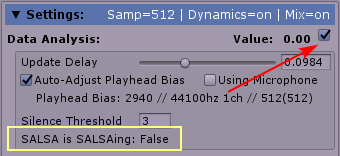
NOTE: There is a Value indicator right-aligned with the Data Analysis section title. Clicking the numeric portion of this display will toggle on/off a VU-style meter in conjuction with the value display. The meter will, of course, be more processor intensive and could impact your scene's playback. The value displayed here is the computed analysis value of the audio file assigned to SALSA's AudioSource reference. It also displays externally driven data values if SALSA is configured to be driven externally (see References section above).
Data Analysis
Data Analysis settings configure the basic properties controlling SALSA analysis. Changing these values do not contribute to errors, but may affect the operation of SALSA in positive or negative ways, depending on the desired look/outcome.
-
Update Delay: specifies a sampling delay (in seconds) that prevents SALSA's engine from performing operations on data, allowing animations to fully reach their potential while maintaining a fluid and dynamic response. Think of this as controlling how often SALSA looks at data and makes decisions on how visemes are turned on/off. Since most animations have a time element which allows them to reach their full potential, if SALSA were to snapshot an audio dataset analysis too quickly, the animations would be turned on and off so quickly they would not be able to reach a visible potential. Likewise, if SALSA updated its analysis too infrequently, the animations would not occur fast enough and would not capture the nuance of compelling lip-sync. Use the default/recommended value (.08 seconds) and only change it if a different look and feel is desired.
-
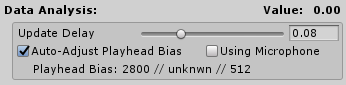
SALSA now includes an Auto-Adjust option for the playhead bias and sample size settings. Auto-adjust is enabled by default and uses calculations based on the AudioClip frequency to determine the bias and sample size adjustments. It also provides a status feedback display that attempts to provide information based on the bias adjustment calculated, the frequency of the current clip, and the sample size selected. NOTE: these values will most likely change as playback begins since some of these items may not be available during Edit time (i.e. when micInput is used or when an AudioSource will be provided at runtime).
-
If a microphone is used, particularly with the micInput add-on for SALSA, the Using Microphone feature is the best option for providing the analysis engine with the best information on where to get the data slice. Keep in mind, this option currently requires the microphone name to be programmatically supplied to SALSA (string microphone). If using micInput, this is super easy to accomplish -- simply enable the "Link with SALSA" option and ensure micInput is on the same GameObject as SALSA.
-
Playhead Bias: is a samples offset setting for audio analysis. Using this setting SALSA can look ahead to begin analysis prior to the audio being played by the AudioSource pipeline. This allows SALSA to complete analysis and trigger animations in conjunction with the audio instead of after the audio has played. The result is an elimination of animation lag and a much better perceived accuracy of the lipsync approximation process. Recommended values are between 2700 - 3200 for audio file playback (44KHz). NOTE: being too aggressive with this setting while using microphone input will yield poor results, clipping or eliminating proper lipsync response altogether. Since microphone data is recorded on a looped buffer, setting the bias too high will actually look past the record-head and instead at old buffer data.
NOTE: Playhead Bias is dependent on the recorded sample rate. If the sample rate is very low, the bias adjustment should be reduced as well. If the audio is recorded at a very high sample rate, the bias should be increased. For best results, use the Auto-Adjust option first and only use manual adjustments if Auto-Adjust does not achieve your desired results.
- Sample Size: this is the number of audio samples SALSA looks at during each analysis snapshot. Depending on the audio file data rate, this window can be adjusted to get a better representation of the audio at the particular time of analysis. It may seem logical to look at data in very small chunks for speed; however, this is not the case and will not produce nice, dynamic lip-synchronization. Since an audio wave oscillates across the zero boundary [-1 to +1] at a very high speed, looking at very small sample sizes is not necessarily indicative of the actual audio. It is highly probable that near-zero analysis levels will be sampled if the data set is not large enough. Keep in mind, a mono audio file recorded at 44.1KHz has 44,100 data samples per second and a window of 512 samples is only .01 seconds of audio.
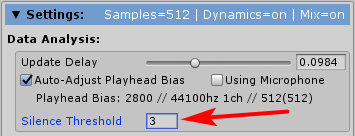
Silence Threshold
- Silence Threshold (v2.2.0+): select the number of "silence" cycles SALSA must wait before declaring SALSA is no longer SALSAing (talking). These cycles are directly related to the Update Delay, which governs SALSA's internal clock (how often it analyzes audio and triggers visemes). A minimum of 1 cycle is required. Experiment to find the correct timing for your needs. A setting of 3-4 works well to trigger only on longer pauses.
NOTE: While in runtime mode, enable Show Analysis
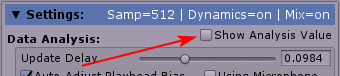
to see a display of SALSA's current analysis state.
Delegate Plugins
SALSA 2.4.0 was the first release to support delegates for plugging custom functionality into SALSA. By implementing delegate calls, some of SALSA's key internals can be re-routed and it is relatively simple to do. See Delegate Processing for more detail.
Dynamics
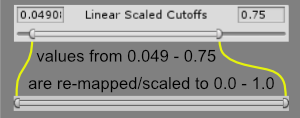
The Dynamics section tells SALSA how to look at the spread of the valid range [0 .. 1] of analyzed data. Using the Lower and Upper Linear Cutoffs together removes sections below and above these values and linearly scales the remaining values across the [0 .. 1] range. This allows trigger values to be set across the [0 .. 1] spectrum without regard for the cutoff ranges, making it possible to easily set and forget the viseme triggers and adjusting the Linear Scaled Cutoffs as needed for changes in audio.
-
Lower Cutoff: is essentially a noise cutoff filter. Any analysis values less than or equal to this setting are processed as zero [0] and ignored by SALSA's trigger engine. The Lower Cutoff is not simply a basic audio gate. While it does discard values <= the setting, it also scales the remaining values starting at zero. The first configured viseme trigger essentially performs the same functionality. However, the lower cutoff is used in conjunction with the upper cutoff to compute a linearly scaled section of the audio analysis range. It is much easier to make adjustments to these settings, rather than micro-managing a set of trigger values every time the audio recording dynamics change.
-
Upper Cutoff: is an easy way to boost audio with low-dynamics by stretching the linear scale of the analysis. When the slider is set to 1, there is no stretching of the audio analysis and the data is processed as-is. However, if the audio is consistently recorded at too low of a level, this slider can be used to scale it up. For example, setting the slider to .75 has the effect of amplifying the entire range, effectively making an analyzed value of .75 equivalent to 1.0 and spreading the remaining range in the same manner.
As mentioned in the Lower Cutoff section above, these two values are both used to calculate a linearly scaled section of the audio analysis values. The lower cutoff defines the lower bounds and values below this setting are considered noise and are eliminated (do not trigger SALSA lip-sync). The upper limit defines the upper bounds and has the effect of boosting the audio -- spreading the whole range across the [0 .. 1] normalized bounds. For example, setting the lower cutoff to .049 and the upper limit to .75 will spread the range (.049 - .75) across the normalized range (0 - 1). This finalized analysis value will then be passed to SALSA's trigger engine to determine what trigger should fire. In this scenario, 0.049 becomes 0.0 (anything less < 0.049 is eliminated) and 0.75 becomes 1.0 (all values > 0.75 are effectively translated as 1.0). This is very useful for trigger configuration. Trigger values for visemes can be set to start at 0.0 and will effectively ignore pre-scaled analysis values of 0 - 0.049 and the overall dynamics of the audio will be improved (boosted) by spreading the remaining range (up to 0.75) across the full normalized range. In this example, a trigger with value 0.80 would not fire for non-adjusted analysis values of 0.75. However, setting the linear scaled upper cuttoff of 0.75 (and lower of 0.049) would fire the .80 trigger for values >~0.61 because of the scaled amplification/boost.
The formula for scaling is:
(analyzedValue - lowCutoff) / (hiCutoff - lowCutoff)
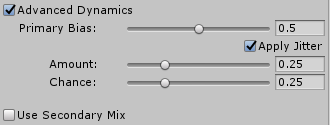
Advanced Dynamics
Advanced Dynamics enables a few more options that provide interesting variation to the trigger engine and help to eliminate stale animation movement.
When Advanced Dynamics is not enabled, the option to set a global dynamic is available. This will adjust the maximum value of each viseme and is a good way to tone down the viseme set if desired. Using global dynamics removes the advanced features, but may be a good/easy way to implement different speech dynamics such as whispering, talking, yelling.
- Primary Bias is the main setting to be aware of for Advanced Dynamics. Its main purpose is to guarantee a minimum animation level for the configured visemes. Learn more about Advanced Dynamics.
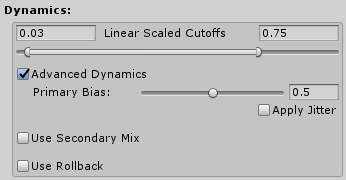
- To further provide variation and eliminate the appearance of stagnant animations (i.e. animations where the same trigger is calculated over multiple SALSA frames, creating an appearance of SALSA being stuck), enable the Apply Jitter setting. Apply Jitter enables two more options:
-
Amount varies the animation calculation by a percentage value. In the above image, the value is 0.25 (25%), meaning the animation value can vary as much as +/-25%.
-
Chance indicates the probability the amount variation will occur. In this case, there is a 0.25 (25%) chance jitter will be applied.
Secondary Mix (3D Only)
Secondary Mix provides additional variation to the animation and generally produces the best results with blended controller types (i.e. the Shape controller). Learn more about Secondary Mix
NOTE: Secondary Mix is a 3D-only option and is mutually exclusive of the 2D Rollback option below.
2D Rollback
Rollback works only with 2D switcher controllers (sprite, texture, etc.) with multi-frame animations and helps eliminate static viseme flipping. Learn more about Rollback
NOTE: Rollback is a 2D-only option and is mutually exclusive of the Secondary Mix option above.
Setup and Processing
Persistence Mode
This Queue Handling option puts SALSA in a persistent mode. This mode attempts to override externally modified shapes to prevent conflict. While performance is relative and SALSA is designed to be as efficient and light-weight as possible, persistent processing does increase queue registration conflict-search calculations quite a bit, more so depending on the makeup of your character model and the number of components used to define your viseme. More components = more conflict searching. Do not use this mode unless you are aware of its caveats and know how it operates or have been directed to enable it by Crazy Minnow Studio.
Capture Initial Static Expression #inDevelopment
Enable this option to have SALSA capture all non-zero blendshapes from all child SkinnedMeshRenderer objects under the SALSA gameObject. This feature can be used when a character model's facial blendshapes have been configured with an expression the designer wishes to maintain at runtime, while the SALSA Suite does its thing. When enabled, at start up, SALSA will search all SMR's for blendshapes with non-zero settings and store these shapes and weights for registration in the QueueProcessor. The registrations will be made persistent and placed in the lowest priority queue, the 'head' queue. SALSA, EmoteR, and Eyes will all smoothly merge back to these settings as their animations turn OFF, restoring the pre-configured expression. NOTE: This static expression can also be captured, loaded, and removed via the API. See the API documentation for more information.
Reset Shapes on Start #inDevelopment
This is the default mode SALSA operates in and this option has been provided to turn this behavior off if desired. SALSA, EmoteR, and Eyes all reset their configured Expressions to min/OFF settings on startup by default. Disable this option to bypass the initial reset of configured components. Keep in mind, disabling this option will not change the end result when the modules have registered components -- they will return to their min/OFF positions regardless of this setting. NOTE: This can be turned on/off in the API.
Copy from SALSA #inDevelopment
This allows the viseme configuration to be copied from another SALSA instance. This only captures the viseme configuration and can only capture bones and/or blendshapes at the moment.
NOTE: Bones and blendshapes must be named identically between character models for this operation to succeed.
Once another SALSA instance is linked in the Inspector, a "Copy" button will be available.
NOTE: Performing a copy operation will over-write any configured visemes.
If this SALSA character hierarchy is differently named from the source SALSA instance, you may re-map any SkinnedMeshRenderer objects, by enabling "Mapped Controller Copy" after the source SALSA instance is linked. The SALSA Inspector will discover all SMRs used in the source SALSA instance and provide slots to link up. Any null slots will be ignored. You may also provide a skeletal root reference if bones are detected. Otherwise, SALSA will search its entire hierarchy for any bone names found in the source SALSA instance on a first come, first served basis.
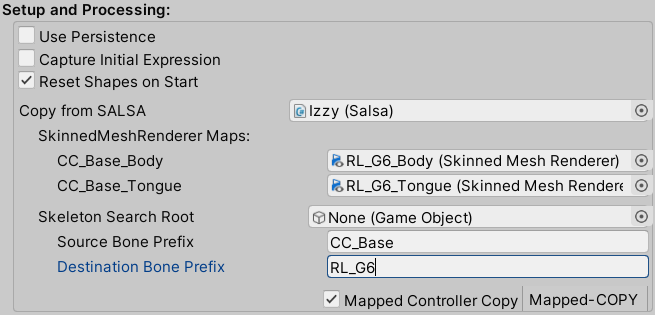
NOTE: Even if source controllers are manually mapped, the underlying blendshape and bone names in the destination SALSA instance must be identical to the source SALSA's. If the source and destination bone objects have equivalent suffixes, but consistently different prefixes, use the source and destination prefix maps to search an alternate prefix in the destination hierarchy.
This copy operation can be performed via code if desired. See the API for more information.
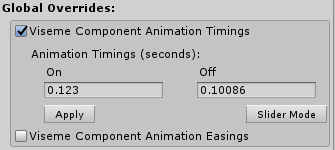
Global Overrides
Global overrides offer the ability to control certain ExpressionComponent settings from a central configuration. Enabling these settings override individual settings for all components. The following global overrides are available:
Animation Timings (override)
There are two modes for the animation timings override: Slider and Input.
Slider Mode
Slider mode offers an easy way to experiment with timings and update delay to find the best look-and-feel for your project. The idea behind slider mode is to tune in the desired animation style without regard for actual numeric values. Understand each slider's effect and then adjust to taste. There are three sliders available:

-
Smoothness controls the animation ON timing and additionally influences the animation OFF timing as well as the update delay SALSA uses for analysis processing. When the 'On/Off Balance' and 'Analysis Nuance' sliders are zeroed, the 'Smoothness' slider will adjust all 3 values equally (ON/OFF/update delay). A higher value will result in a longer time for animations to process, smoothing out the animation. Lower values are shorter times, making the animation faster/choppier.
-
On/Off Balance controls the positive or negative gain applied to the OFF animation timing with respect to the ON animation timing. A negative percentage value will reduce the OFF animation timing with respect to the ON value and vice versa.
For example: Assuming Smoothness is set to 0.10f seconds. Setting the balance to 0% will result in the OFF animation timing being effectively set to the same value (0.10f). Setting the balance to -10% will result in OFF timings of 0.09f. And a setting of 10% will result in a 0.11f value.
-
Analysis Nuance controls the relation of the update delay to the ON animation timing. Overall, a shorter value of the update delay setting creates more frequent analysis, perhaps more accurately measuring the nuance of the sampled audio. However, short delay times tend to produce jittery results and do not allow the animations appropriate time to animate. Longer delay times allow ample time for animation to occur but begin to lose the nuance of the audio dialogue and perceived accuracy will be reduced. It is a balance and that is why the Smoothness slider is tied to this value.
To give the animations time to fully progress to their maximum extents, the update delay should be at least as long as the animation timing. However, it is possible to configure a faster update pulse and slower animation timing and produce a nice, smooth, fully-animated look. Use this slider to adjust the sampling nuance with relation to the Smoothness value. Just as with the 'Balance' slider, negative percentages will reduce the update delay based on the animation ON timing (increasing audio responsiveness) and positive percentages will increase the update delay, potentially smoothing the look and providing more time for animations to occur.
Once the desired look-and-feel has been established the override may be left in place, or it may be applied to all component values by pressing the Apply button. This is a matter of preference and makes no difference to SALSA's internal processing.
Input Mode
Input mode is simply an option to enter specific numeric values for animation ON and OFF values. The update delay value is not tied to this animation ON value, nor is the animation OFF value. You may use this to quickly apply specific values to all components or simply leave the global overrides in place for these timings. Again, this is a matter of preference and makes no difference to SALSA's internal processing.
Easings (Override)
The easings override option operates similarly to the timings override. By enabling this feature, all viseme components will use whichever easing option is selected here. And, by using the 'Apply' button, the selected easing can be applied to all viseme components.
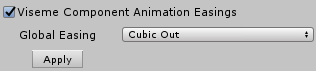
NOTE: While the timings can be adjusted at runtime with good visual feedback, it is best to set the easing value and then run the Editor Player. Changing this value during runtime will produce anomalous results.
Viseme Configuration Section
This section is where all mouth-shape (viseme) definitions are created. SALSA 2, has been re-written from the ground up to be more flexible and subsequently more powerful. However, with flexibility can come complexity and it is very important to understand how this section operates and the tools provided to make configuration easier.
NOTE: Runtime changes of viseme and viseme component configurations can cause errors. SALSA expects some values to be set and available. For this reason, add/delete/copy/paste functionality is disabled at runtime. While it would be possible to implement this functionality, the current decision not to is based on weighing the benefit of this capability at runtime verses the added overhead to a build version, where these calculations and conditionals are not necessary. Additionally, there are currently some viseme component settings that appear to be settable during runtime, but do not appear to do anything. In fact, they do not do anything (at this point). Safe manipulation is being determined/tested and some settings will be enabled and others will not.
The header bar for Viseme Configuration provides information on the configuration status and the number of visemes which have been configured. If any one viseme or individual component has known configuration issues, the header bar will be gold and display "(config required)", similar to the Processing Links header. It also has a status message box, which displays information on why configuration is necessary.
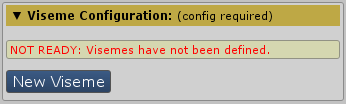
A large, blue button is always at the bottom of this section (see above and below images), allowing easy access to add new viseme shapes to SALSA. The first time this button is clicked, a new viseme is added as well as the viseme's first required component. A viseme requires at least one component; however, can ultimately have as many as desired. For full flexibility, each component of each viseme can have a completely different animation controller (ExpressionController).
For example, this is useful in situations where a model has a jaw-bone which needs to open and close with the blendshapes. Or a tongue that is is bone-controlled.
Likewise, there is no restriction on which GameObject reference an ExpressionController can be linked to. A single SALSA instance could be linked to multiple character models if desired.
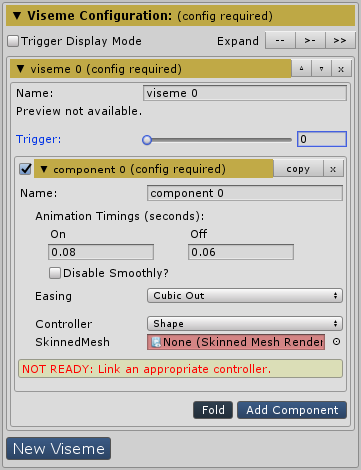
When the first viseme has been added, the section looks like the figure below, indicating the first viseme component requires configuration, in-turn indicating the viseme requires configuration, ultimately indicating the entire viseme section requires configuration. It is easy to see at-a-glance where configuration is needed. In this case, the default "Shape" animation Controller Type is selected, but a SkinnedMeshRenderer is not linked.
Since this section has so much information available, several helpers have been included in the inspector to make life easier. Under the Viseme Configuration section header bar is a toggle box for Trigger Display Mode and 3 expansion short-cut buttons.
Trigger Display Mode
Trigger Display Mode enables a very handy consolidated viewport showing only the viseme trigger information. In fact, it is suggested to not configure triggers until all visemes have been created, then toggle the trigger display mode. The display will list the visemes by name, with a slider control for the trigger value.
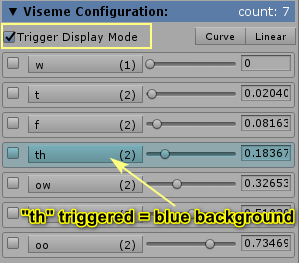
Using this view, it is easy to adjust all triggers at once, with easy comparison to each other. Additionally, there are two distribution buttons in the upper right that will evenly automate distribution of the values. Use either of these methods to quickly place and space your triggers on a curve or linear distribution.
NOTE: In the above image, you will see a light blue background on the "th" viseme. This indicates the "th" viseme has been fired and is only visible at runtime and is new in SALSA v2.5.0+.

NOTE:
-
Trigger values cannot exceed the values (lower/higher) of triggers above or below themselves.
-
SALSA processes triggers in order from lowest to highest (0 to 1).
-
Triggers can be adjusted at run-time for tweaking -- be sure to copy the component values prior to returning to edit mode.
-
The trigger value must be exceeded to trigger the viseme. For example, if the trigger is set to .5, the analyzed value must be greater than .5 to trigger.
-
Triggers are compared to the analyzed value after it has been processed by the linear cutoff/scale function. Therefore, setting the first trigger to 0 is perfectly reasonable and recommended. Simply ensure the Linear Scaled Cutoffs are correctly set for your audio.
NOTE: As of SALSA v2.5.0+, it is now possible to expand the viseme view to display the components and timing settings in Trigger Display Mode. Simply click the button containing the viseme name.

Display Expand/Collapse Modes
Expand modes provide short-cuts to three (3) different collapsing actions for viseme display. From left to right, each mode/button corresponds to collapsed, level 1 expanded, and level 2 expanded (as shown below):
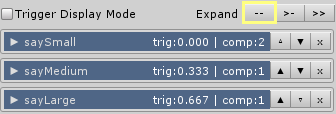
(collapsed view - visemes collapsed)
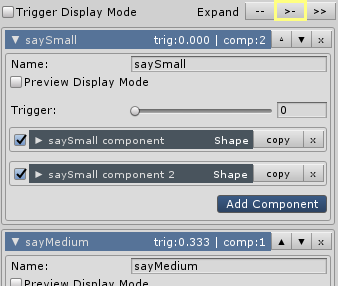
(level 1 expanded - visemes expanded, components collapsed)
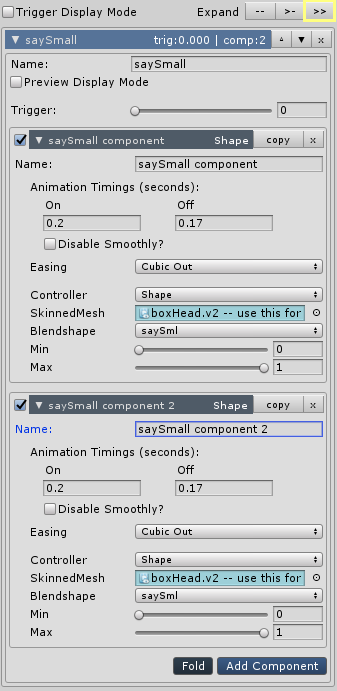
(level 2 expanded - visemes and components expanded)
Viseme Configuration Display
Next, the visemes themselves are displayed (assuming any are configured). Regardless of the type of components used to make a viseme, each will have the following common settings:
-
Name is simply an easy way to manage or keep track of your viseme configuration. The name selected is not used by SALSA for any other purpose. You may change the default name given or leave it as-is.
-
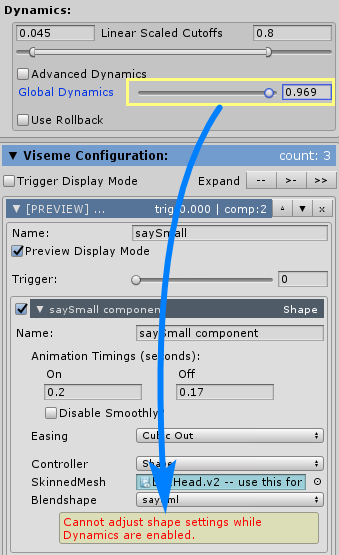
Preview Display Mode sets the configured animation to the full 'On' position for easy viewing/trouble-shooting at design-time. Only one viseme may be in Preview Mode at a time. Enabling Preview Display Mode on one viseme will turn the mode off on any other viseme.
NOTE: If Global Dynamics is < 1.0, it is not possible to adjust Min/Max shape settings.
- Trigger defines the value SALSA will use to determine which viseme will fire when the audio is analyzed.
NOTE: While the trigger value may be adjusted here, for ease-of-use, it is recommended to adjust all triggers together using the Trigger Display Mode (see description above).
- An Add Component button is available to add new components to each viseme. The order of components is irrelevant to operation.
Viseme Components (Expression Components)
Viseme components define the makeup of the viseme itself. A viseme may have any number of components, but does require at least one -- otherwise it might as well not exist. Each component has several settings common to all components, regardless of controller type. Additionally, across the SALSA LipSync Suite, all components are the same and are called Expression Components. The display of Expression Components may vary from module to module. For example, SALSA only uses one-way animation handlers and as such, does not use the Animation Timings Hold value, therefore it is not displayed.
Since all Expression Components are more or less the same, (please read the Expression Components document for more information)
For more component detail, see ExpressionComponents.