Using SALSA with Photon Voice 2
Overview
The following document details the steps used to implement SALSA v2 with Photon Voice 2. These instructions only apply to SALSA LipSync v2 and PhotonVoice2. Previous versions are no longer supported.
NOTE: This document is a demonstration example of how to configure Photon Voice 2 and SALSA LipSync v2 to work together in one, simple instance. It is not intended to be a complete solution to cover all situations or scenarios and no support is offered beyond getting this simple scene to work. Crazy Minnow Studio offers no support for setting up or configuring PhotonVoice or any other 3rd-party asset or system. Please direct PhotonVoice questions to ExitGames support.
Support
We (Crazy Minnow Studio) are happy to provide SALSA LipSync Suite-related support. However, we do not provide support for third-party assets. If you have problems getting the third-party asset working, please contact the asset's publisher for assistance.
NOTE: Please remember, the source is included for this free add-on and this should be considered example code that you can use to jump-start your project. It is not intended to fit all scenarios or requirements -- you are free to update it as necessary for your needs. We do provide limited support for all of our products; however, we do not make development changes to support specific project needs.
For SALSA LipSync Suite-related support, please email (assetsupport@crazyminnow.com) us the following information:
- Invoice number (support will not be provided without a Unity Invoice Number).
- Operating System and version.
- SALSA Suite version.
- Add-on version (generally located in an associated readme or the script header comment).
- Full details of your issue (steps to recreate the problem), including any error messages.
- Full, expanded component screenshots (or video).
- Full, expanded, associated hierarchy screenshots (or video).
- Super helpful: video capture of issue in action if appropriate.
Requirements for This Example Implementation Tutorial
- SALSA LipSync v2.5.0+
- PhotonVoice 2
- For local lipsync only: SalsaPhotonVoice
NOTE: While PhotonVoice2 will work in earlier versions of SALSA LipSync Suite v2, local-avatar-local-client lipsync (local-lipsync) only works with SALSA LipSync Suite v2.5.0+ with the SalsaPhotonVoice add-on (freely available to SALSA LipSync Suite v2 customers on the SALSA Suite v2 downloads site).
ATTENTION: These instructions require you to download and install the appropriate assets and/or add-on scripts into your Unity project. If you skip this step, you will not find the applicable option in the menu and/or component library.
NOTE: While every attempt has been made to ensure the safe content and operation of these files, they are provided as-is, without warranty or guarantee of any kind. By downloading and using these files you are accepting any and all risks associated and release Crazy Minnow Studio, LLC of any and all liability.
Installation Instructions
NOTE: For information on how to import/install Unity AssetStore packages or unitypackage files, please read the Unity documentation.
-
Import SALSA LipSync into your project and please familiarize yourself with SALSA using the online documentation for SALSA LipSync.
-
Import/install PhotonVoice 2 and familiarize yourself with its use and requirements according to the ExitGames PhotonVoice 2 instructions and operational guides.
-
Import this SALSA LipSync v2 integration add-on and familiarize yourself with these instructions.
NOTE: While every attempt has been made to ensure the safe content and operation of these files, they are provided as-is, without warranty or guarantee of any kind. By downloading and using these files you are accepting any and all risks associated and release Crazy Minnow Studio, LLC of any and all liability.
Usage Instructions
PhotonVoice configuration leverages the use of UnityEngine.AudioSource and UnityEngine.AudioClip for playback of serialized voice audio data for remote-avatars on local-client instances. This allows for spatialization of individualized voices. PhotonVoice, by default, does not stream local-avatar-local-client audio data to the local-client. This audio is captured, serialized and sent across the network to remote-clients. Crazy Minnow Studio and ExitGames have collaborated and created an add-on (SalsaPhotonVoice) which makes local-avatar audio stream analysis available to SALSA LipSync, making local-lipsync possible.
While SalsaPhotonVoice should work in most situations, it is not guaranteed to work for every scenario. Feel free to modify the included scripts to your needs. There are two scripts in the SalsaPhotonVoice add-on (SalsaPhotonVoice.cs and SalsaPhotonRecorder.cs). SalsaPhotonVoice.cs is the configuration script and SalsaPhotonRecorder.cs is the analysis provider.
Remote Avatar Lipsync
A remote-client-avatar is considered the default avatar lipsync configuration. The local-client-avatar is considered the configuration exception. Therefore, the spawnable avatar prefab is configured for remote-avatar-lipsync (remote-lipsync). Since PhotonVoice utilizes Unity's AudioSource and AudioClip this is easy to wire up. In the PhotonVoice included demo scene, the resource prefabs are already configured with an AudioSource and this can be wired directly into the SALSA AudioSource reference slot.
Local Avatar Lipsync
To facilitate the requirements for local-lipsync, the SalsaPhotonVoice addon is used. It is added to the same avatar prefab used for the remote-client-avatar and will convert the avatar's configuration to a local-client-avatar automatically.
SalsaPhotonVoice must be downloaded from the Crazy Minnow Studio, SALSA LipSync Suite v2 website using your customer credentials.
In its simplest implementation, SalsaPhotonVoice automatically wires itself up when it, PhotonVoiceView, and Salsa are all on the same GameObject. However, it can also be manually configured if the three components are all on different objects.
The SalsaPhotonVoice add-on uses PhotonVoiceView to determine if the avatar is the local-client-avatar and places SalsaPhotonRecorder on the Recorder object and re-wires SALSA to utilize external audio analysis, pointing the external analysis delegate mapping to SalsaPhotonRecorder. SALSA will then poll SalsaPhotonRecorder.GetAnalysis on its normal tick cycle for audio analysis.
Creating a Spawnable Character Prefab
In this workflow, we will be converting one of the Photon Voice 2 character prefab resources to work with SALSAv2. We will replace the existing model mesh with the boxHead model as an example.
NOTE: This document assumes you have already imported/installed Photon Voice 2 (including setting up your AppId and any other Photon-specific settings) and SALSA LipSync Suite v2.
- Navigate to the prefab resources folder (Photon Voice 2):
Assets > Photon > PhotonVoice > Demos > DemoVoicePun > Resources - Select one of the existing prefabs and duplicate it (we will use the ZomBunny prefab).
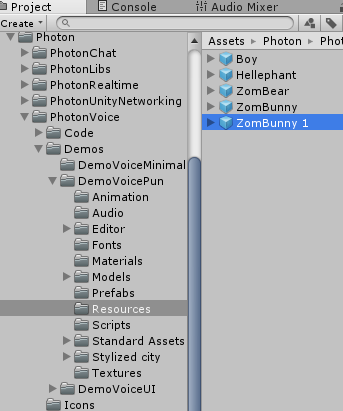
- Rename the new prefab if desired (we have renamed it to boxHead).
- Open the prefab to edit (using the method appropriate for your version of Unity).
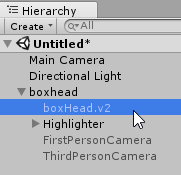
- Expand the prefab and remove the existing model mesh.

- Add the boxHead v2 model to the prefab.
- Select the prefab root.
- Add SALSA LipSync to the prefab.

Configure SALSA:
-
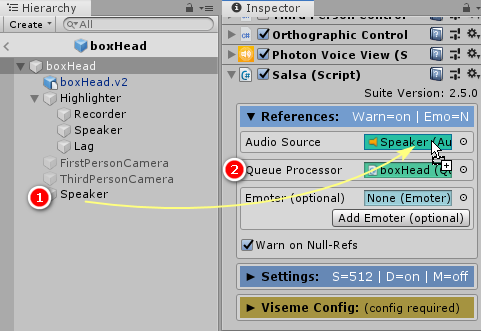
References Section:
- Link the Speaker object in the prefab (this is where the AudioSource is configured on the prefab) to the SALSA AudioSource reference.
- Click the "Add QueueProcessor" button.
- References should now be (configured) blue.
- Collapse the References section.
-
Viseme Configuration Section:
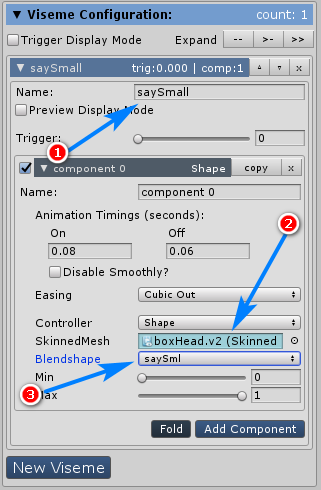
- Click "New Viseme" to create the first viseme.
- Rename the viseme if desired (we are calling it saySmall).
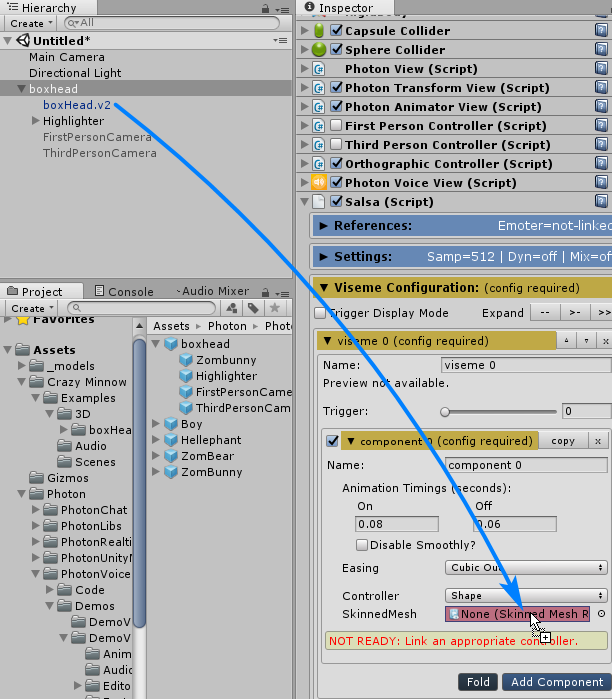
- On the first component, drag the boxHead model reference from the scene to the SkinnedMesh slot under the Shape controller for the viseme expression component.
-
Select the saySml blendshape.
-
Click "New Viseme" to create the second viseme.
- Rename the viseme if desired (we are calling it sayMedium).
-
Select the sayMed blendshape.
-
Click "New Viseme" to create the third viseme.
- Rename the viseme if desired (we are calling it sayLarge).
-
Select the sayLrg blendshape.

-
Select "Trigger Display Mode".
- Select Curve.
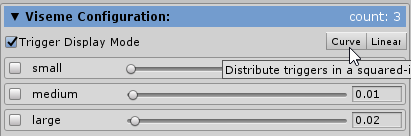
-
SALSA is now configured.
Configure Local LipSync (if desired)
If your project requires local lipsync, you may use the SalsaPhotonVoice add-on to implement it. SalsaPhotonVoice is available to existing SALSA v2 customers on the SALSA v2 download site.
Add the SalsaPhotonVoice component to the same object where SALSA and PhotonVoiceView are configured. SalsaPhotonVoice will configure itself if all three components are on the same object, which should be the case if you are re-purposing one of the PhotonVoice demo prefab resources.
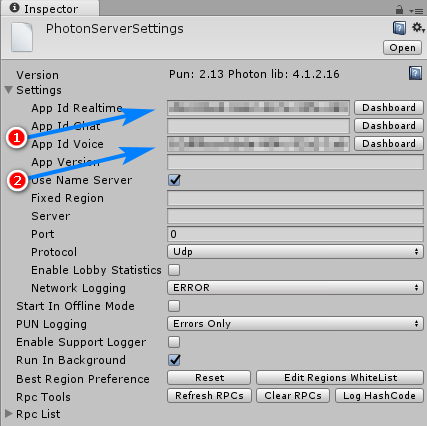
If you are manually configuring your prefab and decide to use an alternate object/component hierarchy, it will be necessary to manually link the (1) SALSA and (2) PhotonVoiceView components to SalsaPhotonVoice.

For more information, see the Technical Notes section above.
Save the Prefab
Save the prefab using the method required for your Unity version. Refer to Unity documentation and support if you have questions about how to save your prefab.
Configure the Photon Voice Demo Scene
- Open the demo scene:
Assets > Photon > PhotonVoice > Demos > DemoVoicePun > DemoVoicePun-Scene - Save the scene as a new scene (this backs the scene up so we can work on it without damaging the original example scene).
-
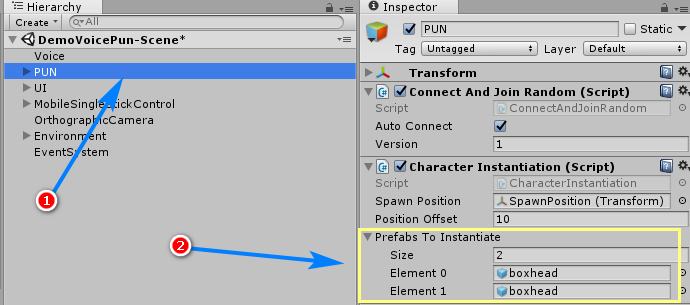
Select the PUN GameObject.
- Under the Character Instantiation component, configure the new boxHead prefab.
- Change the Size to 2.
- Replace the existing entries with the boxHead prefab created in the above section.
- Under the Character Instantiation component, configure the new boxHead prefab.
-
The scene is now configured -- save the scene.
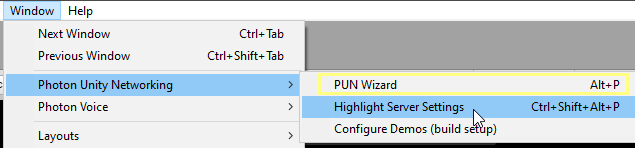
Configure Photon PUN Services
- Run the PUN Wizard to configure your services.
- Enter your AppId
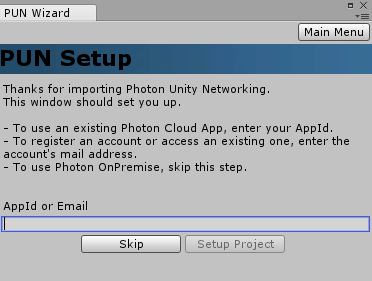
- Enter your Voice App ID
Test the Scene
- Open Build Settings.
- Add the scene to the 'Scenes in Build'.
- Build the project.
- Launch the built project.
Enable:- Voice Detect
- Transmit
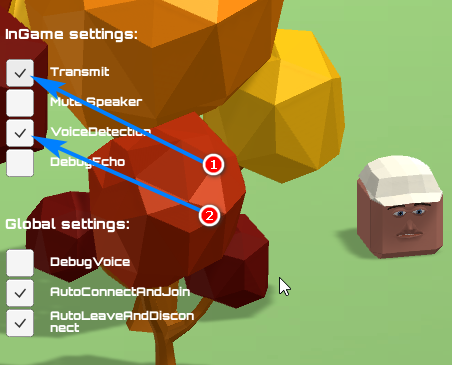
- Next, run the Editor project.
- While speaking in the microphone, the avatar from the Build instance will lip-sync in the Editor Instance.
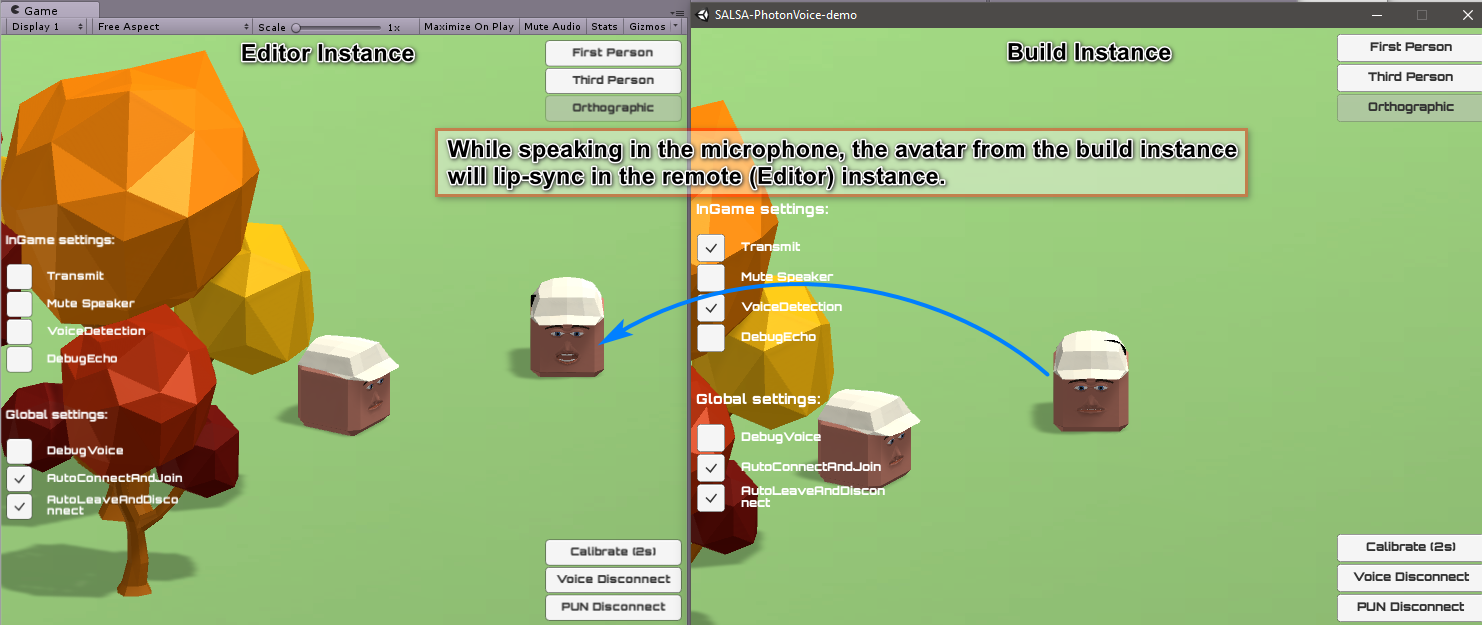
NOTE: Enable Transmit in both instances to lip-sync to the remote instance.
API Information
- Currently, there is no API for this add-on.
Troubleshooting and Operational Notes:
- No known issues.
Release Notes:
NOTE: While every attempt has been made to ensure the safe content and operation of these files, they are provided as-is, without warranty or guarantee of any kind. By downloading and using these files you are accepting any and all risks associated and release Crazy Minnow Studio, LLC of any and all liability.
v2.5.0 - (2020-09-10):
+ Initial release for SALSA LipSync v2.5.0